19 Mar 2016

On looking for inspirations outside photography


I have experienced already several times the situation that my adventure with photography was kind a stuck. Somehow the energy wasn't there.
Internet is full of the similar stories with tons of advices on how to get out of there. I have tried quite a lot of them and they helped. So I could move on and continue to enjoy photography.
But there are another aspects of "moving on" with photography. For instance - set a new direction, try completely new genre, abandon some techniques in favor of the new ones.
I think that it is more difficult to start such movement since it often requires an inspiration from the outside world - something that opens the new perspective.
I don't think there is a general receipt about how to find something inspirational, but I can tell what worked and works for me very well. It is a dialogue between a writer and a photographer.
A friend of mine is a writer and she publishes regularly on the internet. Once she came to an idea of illustrating her stories with my photos. I liked it very much so I started contributing to her blog. From the photographer point of view it is a very enriching experience. After reading her texts I had to look at my pictures in a very different way - taking not only technical aspects of the photos, but foremost the much less obvious elements, like symbols, items that on one side match the story but on the other are not too obvious.
This caused me to start thinking about my photos again. Sometimes when I couldn't find anything good I took a camera and made a completely new picture.
What can be more inspiring?
Well, it turns out that such dialogue has also other part, originating from a photo. Sometimes my photos inspired her to write a new story. Which to me means that at least some of my photos probably contain something more than an illustration or snapshot of reality. Again, this forces me to think about the photography in a new way. Looks like adding a new dimension to my photographic journey.


Speaking about journey - we continue this exciting dialogue between writer and photographer but we'll try slightly different form. From now on I'll be publishing my photos on a separate site: The Quest Never Stops. I am looking forward to it.

21 Jan 2016

From a regular snapshot to a decent one

Recently I was enjoying a party together with a group of friends. And there was a moment when they asked for the photos. It was evening, in a quite dark room, so there was not much options for lighting: I had to use flash or I had to crank the ISO up to 6400. So I have chosen for flash.

I started with one flash with omnibouncer, placed on the camera, directed 45 degrees towards the ceiling. iTTL mode did the job well, the only thing I had to do was to reduce the flash power by 1,5 stop, to balance a little bit with the background lighting. The result was, well, as expected:

The faces are well exposed, but the effect is rather disappointing: the scene is flat, shadows on the faces rather uniteresting.
But then I saw the possibilities to redo the scene with another lighting setup. Since I had 2 flash lights I decided to place them in the room according to the scheme shown below:


The light sources were SB-900 and SB-910 speedlight flashes, with omnibouncers, directed 45 degrees towards the ceiling, slightly above the model, both in the iTTL remote mode. They were triggered by the built-in flash of my camera. As previously, I adjusted the power of the flash by -1,5 stops - to show a little bit more background. I knew that the photo would be slightly underexposed, but I would be able to easily correct it in the post processing. The result was (in my opinion) much better:

Now I have separated the model from the background (look at the left shoulder of her and the top of the hair). Next to that, thanks to the light source on the left side of the camera I got the interesting shadow on her face, giving much more shape to it than on the first photo.
Of course, there is still a dozen of things to be improved (composition, background, white balance of the flash, just to mention some) - it is still a snapshot, after all.
But the learning is that it is always worth trying something else than on the camera flash. The setup cost me about 5 minutes but opened plenty of new possibilities of exposing the scene.

18 Jun 2015

Taking photos of groups of children - some tips and observations

Recently I had an assignment to take photos of the several school classes. The final 'product' were the standard group photos of school classes:


Although it looks simple, there are some aspects and potential challenges that require at least some attention.

The location and lighting

Choosing the right spot for a shoot is not trivial, especially when the only available location is a school playground: a lot of open space with the school building as the background. Not very exiting, I'd say. Additional problem was the full sun at this day which would guarantee harsh shadows on the faces of the children. Luckily, at the border of the playground there were some trees that gave enough shadow to cover the whole group. Shadow coming from the tree provided decent light for the shoot: diffused on one side, but bright enough to be able to shoot with the 1/100s, f/7.1 and ISO 200.
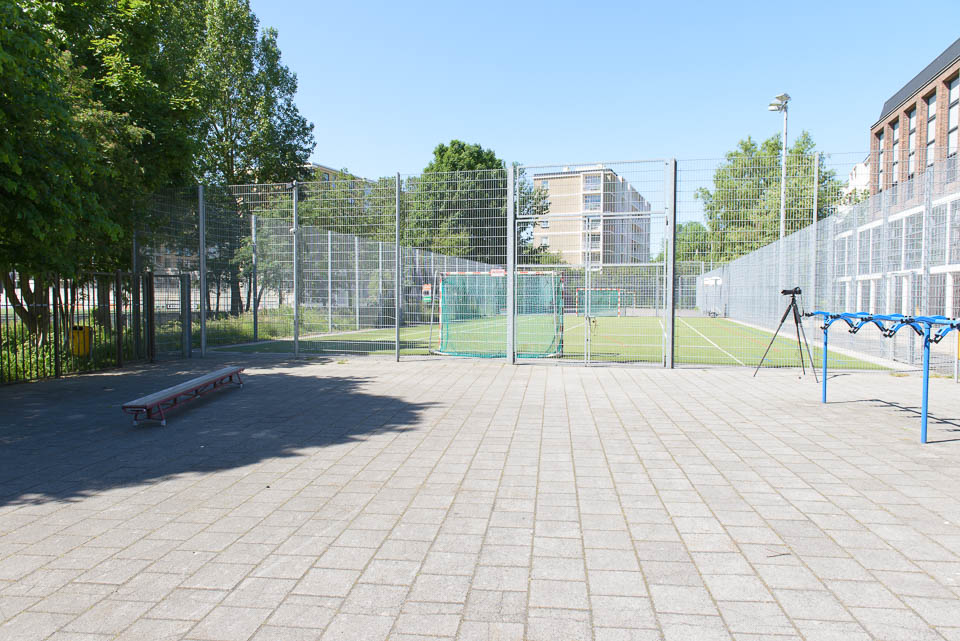
Last but not least, the trees served as a nice background for the photo. My setup looked as shown in the picture below:

The bench in the shadow was the main 'stage', while the camera was about 10-15 meters away, put on a tripod (right in the picture) The lens used was 200 mm lens, set to about 135 mm. This focal length was good enough to compress the foreground with the background a bit.

The background was not perfect though. There were still some distracting elements there (like the fence and the bright part of the building's roof. 


This was the moment of a trade off: lighting wise it was the best spot I could get, so I was pretty sure that the most important objects on the photo (children's faces) would be properly lit. The distraction I could eliminate, at least partially by careful composition and doing some post processing.

 The last aspect to take care about was the color of light. Since the shadow was given by the trees, they could cause some color casting. To prepare for it I took several pictures of the color checker placed on the spot. I use X-Rite color checker for this purpose. X-Rite software integrates well with Lightroom  and makes creation of the color profiles quite easy.


The limited time

This is almost always the case at school: tight rhythm of the day: 45 minutes lesson, 10 minutes break, next lesson. So is the time of the photoshoot. Per group I had roughly 5 minutes time: to set up the group, to take 1-2 test photos, do some reshuffling of children, cherry up some of them, calm down most of them, take the final picture. 
Interesting observation is that teachers are not of much help in such situation: they are part of the group waiting for the directions. So it is important to have a plan and be ready to play the role of a 'director' of the shoot. 


Direction and communication with the group

First of all I have pictured in my head the end result. To play safe I applied the simple principles to make the process simple: most people read visual information from left to right and from top to bottom. Another basic principle was to ensure that all the faces are good visible and not covered by other children or other obstacles. Having all this in mind the direction was straightforward: I created 2 rows, ordered taller children to step on the bench, less tall ones to stay on the ground. Then (if required) I reshuffled them to ensure that the rows visually form more or less straight line. 
Again, it is the tradeoff, balancing the certainty of the final shot, the (limited) artistic values of the photo and limited time. 
Each time I was explaining the process at the very beginning: I have noticed that this way I can have children's attention for at least couple of minutes.
To enhance communication I decided to use the trigger cable for releasing the shutter. So I was able to stay next to my camera and have direct contact with the group. It worked well, especially when I had to give some extra directions. For example, it is pointless to say to the group: "and now move 0,5 meter to the left". Instead I was making a step aside asking them to do the same. It worked well.
For the final shot I explained that I will be counting till 5 before taking the shot and was showing the number with my hand. In fact I was taking the actual shot at "3" or "4". This simple trick ensured that they all watched at me (or rather my hand) and I could catch their eyes on the picture.


Watch out the equipment

This is very important, especially when one stays on the playground. The thing is that the children start run and don't watch at the obstacles. So it is absolutely necessary to stand by the tripod and mark your spot this way. Otherwise there is a risk that they tackle the gear. This happened to me some time ago when one of the children run against the light stand with attached flashlight and an umbrella. As a result thereof I had to buy a new umbrella.


27 Apr 2015

Tagging people in Lightroom CC (also Lightroom 6) - some tips

The newest version of Lightroom CC (Lightroom 6) comes with a number of new features. One of them is the automatic face recognition which enables tagging people on the photos. To me it is a very welcome enhancement of Lightroom since it makes possible to keep the records of photographed people in an easy way.
Last week I let Lightroom scan for the faces in my main catalog. It turned to be a long process. Granted, my main catalog contains over 80000 photos, so a number of faces there is substantial (more than 38000 and counting). And the process of finding faces runs for almost 4 days over all photos.

Finding faces is one thing, putting the names behind them is something else. The algorithms applied in Lightroom do the job quite well and after some time and tagging several names, the application starts recognizing similar faces. But the algorithm is not perfect and I have experienced quite some "missers" (faces that were recognized incorrectly).

So to speed up the whole process a bit I have developed simple workflow that is based on structural elimination of the photos scanned by Lightroom and  use of keyboard shortcuts.

Step number one: eliminate photos of unknown or people you are not interesting in

When looking for people, Lightroom tries to automatically attach the names to them based on the information gathered so far. If it cannot find any similar person the name is left empty and there is a '?' sign below the photo to indicate it. If the name is attached, Lightroom asks the user for confirmation, by displaying for each thumbnail the check- or cancel- mark for confirmation or cancelation, respectively. When the name suggested by Lightroom is wrong one can discard it or remove the particular thumbnail completely from the further analysis. By discarding the wrong name, the faces are returned back to the analysis and Lightroom tries to attach another name to them.
In case of the photos of unknown or unwanted people it is useful to remove them from further processing. So when I have a screen full of thumbnails, I first select all the photos I don't want to process further. Then I simply press Delete key. They are removed from the grid and are not processed by Lightroom. By repeating this step consecutively, the grid will be gradually filled with the faces I want to add to my database.

Step number two: Select the faces belonging to the same person, tag them in one step

Now I select all the faces that belong to the same person. Usual way of selecting is applicable here: by holding Shift and clicking on the thumbnails for continuous photos in the grid or by pressing Ctrl (Command) key and clicking on a single photo. It does not matter how the Lightroom categorized the face: with a guessed name or with a question mark. Once the photos are selected, I press the Shift-O key to edit the name I want to tag the faces with. This name will be applied to all selected photos.

Step number three: Repeat steps one and two until you are done


Some other tips

I have noticed that for large grids Lightroom has some troubles with rendering them, which slows the process down. So it is better to navigate somewhere to the smaller structure in the catalog (a collection, collection set or directory). If such set contains no more than couple of thousands faces, Lightroom renders them smooth.


25 Jan 2015

Dealing with limited lighting equipment - when choices have to be made

It happens every now and then to me: when setting up the lighting for shooting I realise that I would like to have more lighting to achieve the desired effect. Not so long ago I was shooting an event at school where my wife teaches. The event consisted of several parts: some performance on the stage and a mini-concert on a piano (standing off the stage, just in front of the audience)
For the light setup on the stage I wanted to use a well proven setup for boosting the stage lighting. But then I have realised that photographing the piano player will be difficult. I had not enough light equipment to serve both purposes. So I needed to make a choice with my setup: concentrate the lighting on the piano or on the stage.
To decide I looked at the rehearsal of both events. It turned out that the singers on the stage are individuals, so the stage lighting provided for their performance would be enough. To make a sharp, steady shot of them I would have to crank up the ISO settings to the 1600+ regions, but it is not a problem to my camera.
Then the lighting for the piano. I wanted to create some drama during the pianist's performance on one side and show a context of his concert on the other. And to put enough lighting on the player of course, to make him the most dominant element of the picture.


The drama was coming from the stage lighting (a high power tungsten reflector). The light for the pianist was delivered by the SB-900 flash light put inside the Lastolite softbox. To balance the color temperature of the flashlight with the stage lighting I put the full CTO gel in front of the flash light.
So the whole setup looked like that:

The softbox being the extra light source gave enough exposure on the back of the pianist and also provided additional light on the keyboard.

Another advantage of the extra light source was that the piano was better exposed while shooting from another angle. 


23 Dec 2014

Photographing a wedding - what could I have done better?

This is the last post of the series about my assignment I did some months ago. I have written about different aspects in part 1, part 2 and part 3. Today I will try to summarise most important improvement areas. Just to remember about them in the future.

Have a second shutter

Capturing all important events during the wedding is difficult, sometimes even not possible. I had one moment that I had to be at two places simultaneously. And I of course couldn't. After the ceremony, best man and best woman were signing the marriage certificates (which deserves a picture). At the same time the couple obtained best wishes from the priest. Being focused on the couple I had to skip the moment of putting the signature by the best woman. The second shutter would solve the problem easy. 


Mind the background. All the time

First plane is important. But the background can weaken (or even ruin) the picture. Just a few examples.

In the picture above there is everything in place on the first plane: beautiful woman, nice light, great moment of joy. But the background works distracting. It would have been better to move the camera just 40-50 centimeters left, and a little bit down. Just to have only one wall of the room as a background.

The above picture has a wooden frame on the left side that works distracting. Again, moving the people just a few centimeters to the right would solve the problem.

At last, an example of the great moment where a lot of joy and love is going on between the bride and groom. If only the fragment of the building wouldn't be captured... To be honest, that was just a first test shot to check the lights. And because I have noticed the cluttered background I could correct it in the latter shooting.
Note that to some extent those kind of mistakes can be corrected in the post processing. But it cost a lot of time and is not always possible.

Mind all the guests

While the wedding focuses on the bride, groom and their closest relatives, in my opinion it is important to capture also as much as possible material that will document the day in the future. For this occasion I have realised that I didn't put enough attention to the guests in the church. I simply didn't capture all of them! Luckily I had all the important persons in picture, but still - I could have done better.


Some technical challenges (and my solutions to them) experiences during photographing a wedding

It is time to catch up a bit with my notes on the photographic journey. In this post (being continuation of part 1 and part 2) I'll give some examples of the technical challenges I saw, together with my solution to them.

1. Low light, moody scene

That was one of my primary concerns. It's because the couple planned a very important moment during the ceremony that started with... complete darkness. Guests were standing in a room, handling small candles in their hands (not enlighten yet). The couple walked in a room with a candle and gave a light to each quest. So gradually the whole room become enlighten by a 'travelling candle light'. It was beautiful, very symbolic and powerful ceremony. And challenging to capture it right. To make it right I have taken some precautions:
- I ensured a right spot for shooting: by putting a small stair-ladder in the corner of the room I placed myself beyond the heads of other guests. So I ensured the clarity of view
- I ensured the full control about the exposure. Therefore I used a light meter in incident mode, before the ceremony started. I simply took a candle, put a light meter in the distance of 50-60 centimeters from it, directed the incident meter in the direction of the candle. Took a measure. This 50-60 centimeters was my estimation of the distance between a candle held by the couple in front of them and their faces. Measured exposure was the one I was intended to use. Then I put my camera in the manual mode with the settings given by the light meter. I liked the effect:


2.  Fast changing scenes

This is just given. While the ceremony in church is predictable, things at the reception might be surprising every now and then. And I had to be prepared. To deal with it I was walking with two cameras. One equipped with 24-70 mm lens, another with 70-200mm lens. Just to be able to cover as much as possible with the optical range. The disadvantage of such approach is weight to carry but at the end it paid off.

3. Unattractive light

Something to always take into account. I have used an extra light source, being speedlight flash which I placed on a monopod who was carried by my assistant. To trigger it I have used the radio triggers from PocketWizard (FlexTT-5 system for Nikon). I must say it worked very well. I practically didn't miss any shot. And I have much more flexibility in comparison to the iTTL system of Nikon.

4. Getting the right content for a photo album

This last one is on a boundary between technical and 'human-related' one. When taking the assignment I had the end product in mind, being a photo album (which was meant as a wedding gift for the couple). So I had to produce a content that fits well into such album. The thing was that the couple was not so keen on taking much of the extra effort to organise a separate session. To solve it I took an 'easy going' approach (betting that it would work): I suggested (without specifying a time frame) just a small walk during the ceremony to a location nearby the wedding venue. Luckily they didn't know that there was a nice, long pier going into the sea. So they got curious about the location and I had a few nice shots.


1 Sept 2014

Once more about shooting the wedding (what the teachers don't tell)

Let me start with the disclaimer first. This post is not a rant. On contrary, let me start with saying couple of nice words about people who shared their knowledge about wedding photography online and this way teached me how to start. Cliff Mautner, Jerry Ghionis, David Ziser, Frank Salas are photographers whom I follow via KelbyOne, their blogs and other stuff on Internet. All of them are great teachers and I am sure they are 100% integer. After watching their courses and reading what they publish one can know how they shoot photos they have in their portfolio. They reveal all photographic knowlegde, tips and tricks. So my great thanks to you, guys.

The thing is that they teach about photography. Which is perfectly fine and this is what aspiring photographers (like me) want. A wedding is means not only shooting photos for a couple of hours. It is an enterprise taking 10-14 hours of time on location. So there are couple more things next to photography to think about.

Nutrition

Sounds simple, but it is better to plan the meals during the day. During my assignment I had a luxury having my lovely wife at my side who took care of this aspect. So even if I was busy, she ensured that during short breaks I had a right stuff on my plate. Since I was also a guest of the bride and groom during the wedding, it was quite easy to arrange that. But in general I think it is better to organize things upfront and be prepared. Depending on the place and the local customs I can imagine that it even could require some contractural agreements with the bride and groom.

A place for the gear

Even if I planned my equipment for the wedding to be as lightweight as possible, I needed a safe place to store some stuff that I didn't need at the moment. Again, my situation was comfortable since I had a hotel room just next to the place where ceremony was organized. But in general - it is a good idea to think about it in advance. 
So, why it is not mentioned during the classes about wedding photography?
I think the reason is simple: for the instructors - all being practitioners for tens of years - it is like breathing for all of us. So it is probably just so obvious that it is not worth mentioning. And strictly speaking it is not about photography. 


30 Jun 2014

Preparing for the wedding shooting session - how I have dealt with uncertain situations

This is the second post about my big photo assignment I have taken couple of weeks ago. As usual, when doing unusual photography assignments I always prepare as much as I can. For the wedding I had couple of special reasons:
- for a number of scenes I had only one chance to take a photo (the bride and groom say 'yes' only once),
- wedding photography was (and still is) quite a new territory for me,
- I was not so familiar with the ceremony and the rituals celebrated in the church,
The most important reason was to deliver the best possible photos I could make. And good preparation would help to minimize the need of improvisation.
Sure, I know that it is impossible to plan everything. There would always be surprises and unplanned situations. And that is fine. But by preparation I'd like to create a room for improvisation (if needed) to get an excellent picture. And not to improvise to get the picture at all.
So here comes my list of preparations I took. All of them helped. There are also some things I could have prepare better. Something to remember and apply for next time.

  1. Get to know the program of the day. The easiest but the most crucial part of the preparation. Talk to the couple, make a list of events during the day, but don't forget to note the times. For me it was kind a frame where I could put my photographic activities. Having that I could see for myself how much room I had for shooting. In case of this wedding it became clear that there will be no room at all for a real shooting session with the couple alone. After some consultation we agreed not to push for it and accept if such photos couldn't be made.
  2. Scout the locations. I did it twice. First, by studying the church and the wedding room based on the pictures available on Internet. Then, a day before wedding I have been on both locations with my camera to see the places in 'the real'. It gave me answers on a lot of questions. For example: how the light is distributed along the aisle and where to take the position for the 'walk-in' photo. How the altar is lit, is there enough light for shooting without a strobe? 
    The same held for the place of reception. Short inspection of the surroundings gave me new inspirations for a shots of the couple. I discovered a nice pier that almost always opens nice possibilities of a good, moody shot.


  3. Learn how the ceremony would look like. In this case it was double important: first of all I was quite unfamiliar with the order of events during the ceremony. Second, this specific wedding was extended with a lot of elements that are not normally present. Again, talk with the bride and groom helped a lot. Next to that I studied the Internet and the official prescriptions of the Catholic Church. And I visited the real ceremony short before the wedding to get a better feeling on how it looks. This gave me eventually a lot of confidence and also a little extra time that I could use to take some less conventional shots, like this one:


  4. Check local laws and customs. It does not have to be an issue, but I was aware that the Catholic Church in Poland officially requires a kind of certificate from the photographers who want to take photos during the devotion. And formally a priest can even refuse admittance of a photographer who doesn't have such document. For me it was not possible to arrange such document in a short time. Again, the couple solved it for me, by talking to the master of ceremony. But in general case it could be a 'show stopper'. How did I know that it might have been an issue? Well, simply by thinking ahead about things that might go wrong. 
  5. Make an overview of photos that are compulsory. For an occasional wedding photographer as I am it is really a 'must have'. Since just a list is rather boring and uninspiring, I have created a 'mood board': quite large sheet of paper with the characteristic wedding pictures that I found on Internet. I put it on the wall in my living room for a couple of weeks and each day I studied it a little bit. Next to that I also drew a lighting setup for the specific photo and discussed it with my assistant.
  6. Get to know people involved in the preparations. This is something I need to organize better next time. The biggest mistake was not to talk in advance to the master of reception. As a result the program of the reception was to me totally unknown and I had to follow the flow of events quite blindly. In the course of reception we have aligned 'the agenda' several times so it was corrected somehow, but in the beginning I was rather walking behind the facts. That was the part when I had to improvise to get decent photos. I think I delivered the results, but it was not fun and not very professional. 
  7. Talk with someone about the plans. Here I used great help of my lovely wife (who was also my shooting assistant during the day). We have discussed different aspects of the day, pointed the possible risks and limitations of the different ideas.
  8. Study, study, study. I cannot stress it enough. I have watched and read quite some amount of materials available on Internet or in the books. There are dozens of places where I could find the information, so it is impossible to mention all of them. Let me just mention Kelby One, who hosts video courses of great wedding photographers, like Cliff Mautner, David Ziser, Jerry Ghionis. Photography Life is another source I visit regularly (btw, their scope is much broader than wedding photography only).
  9. Practice, practice, practice. Here I mean not only photography skills (it is obvious - I have to learn the craft to deliver (at least) decent shots and deliver them repeatedly). But shooting a  wedding involves a lot of communication with, well, mostly strangers. During this communication I had to guide them, to pose them, simply to become a 'director' of the scene. Since I am rather an introvert person, this kind of interaction is not the easiest thing for me. And it is not something that one can learn overnight. To me it took some time to learn at least the basics and I had different occasions to exercise it in the past. But is it enough? To check it I had to be creative and opportunistic. Couple of weeks before the wedding our friends came to visit us. One of them is a trainer specialized in interpersonal communication and development of communication skills. So I simply asked her for help. I offered her and her partner to make couple of nice photos of them but asked her to observe me during the session and point out the things that I could do different or better with respect to communication and guidance. It was simple, but very efficient. I got some very good tips, they got nice photos. And I felt much more comfortable during the wedding.
  10. Prepare the gear properly. This will be the topic of one of the next posts, so I let it here.

15 Jun 2014

The biggest photo assignment of this year (so far)

Last week I had a pleasure of shooting the wedding of my friends. It was a quite big assignment, since we agreed to shoot the "full package" — from the preparations starting in the morning,  till the wedding reception late in the night.
It was a busy, dynamic and very interesting day — in all kinds of aspects, including photographic ones.
Was it easy? Well, yes and no. An easy part was the contact with the bride and groom - I know the bride for years and it was quite straightforward to establish and maintain a good contact with her during the day. The groom turned out to be a great guy. Since the couple is truly in love I had plenty of moments where the good emotions, like love, joy, devotion were just popping out of them.
There were of course difficult moments I had to deal with. The reception was conducted in a quite high tempo, with a lot of situations to be captured. There was no time during the day to organize a shooting session with the couple. So I had to deal with artificial light in the evening. The wedding ceremony took place in a catholic church with a lot of rituals and moments that were quite new to me. So I had to find a way of making good pictures despite my ignorance of the religious matters.
I still don't know if my assignment is successful (first, I wait for the feedback from the couple about the photos; second — the final product, which is the wedding album is being edited).
Nevertheless I think it is worth spending some time on writing down observations that I have made and lessons that I have learned.
In the coming posts I'd like to write about:
- preparations for uncertain situations,
- lessons that are not taught during courses of wedding photographers,
- technical challenges and solutions
- things that I could have done better

29 May 2014

On using light meter

After quite some consideration and reading a lot of stories on the Internet I have decided to give it a try and bought a light meter (Sekonic D758DR). Did I have a direct need to have one? To be honest — no. But I learn photography and I know that I need to understand better how the light works to enhance my pictures. And the accurate light measuring device can help me with the learning process. Another motivation was the observation that I have to adapt the exposure of quite a lot of photos in the post processing. This is quite tedious, especially when the photos are taken in big series (like a shool event, a wedding, etc.).
Using the light meter efficiently takes some practice. Luckily there are tons of materials which help to start. After some small (mostly technical) issues were solved the light meter became a very useful tool.
Here is where I use it most till now:

  • Examine the dynamic range of the scene while shooting landscapes. It is a real time saver, since often it turns out that using the bracketing and exposure blending in post processing is simply not necessary. Without the light meter I used to take 2-3 photos in bracketing mode ("just to be sure"). 
  • Making portraits. Here the light meter rocks. Really. Period.
  • Learning the light. Another important aspect for me. With the light meter in hand I can quickly validate my ideas about the light intensity and learn to estimate them better.
  • Find out the influence of the light modifiers on the exposure. With the light meter I have measured how the light modifiers that I use (for example my big diffuser) limit (absorb) the light, which in turn speeds up my decisions how to expose the scene when such modifier is used.
First tangible results of using the meter are also becoming visible. I have noticed that I indeed spend less time in Lightroom adapting the exposures of my photos. Which gives me time for other activities.

6 Apr 2014

Tagging photos efficiently in Lightroom (with help of Keyword sets and keyboard shortcuts)

One of the features of the Library module of the Adobe Lightroom is the possibility of tagging photos stored in the catalog. Tags, next to collections, are invaluable when a photo has to be found quickly. The issue with tags is that they require some discipline to maintain them and to ensure that all the photos are tagged properly. Probably the best way to keep the catalog well tagged is to apply the tags to the photos during import or just thereafter. Otherwise the number of untagged photos just grows over time. This article is about dealing with a lot of untagged photos in a catalog in a efficient way, by using only the keyboard and not to type keywords at all during tagging.

Find the untagged photos

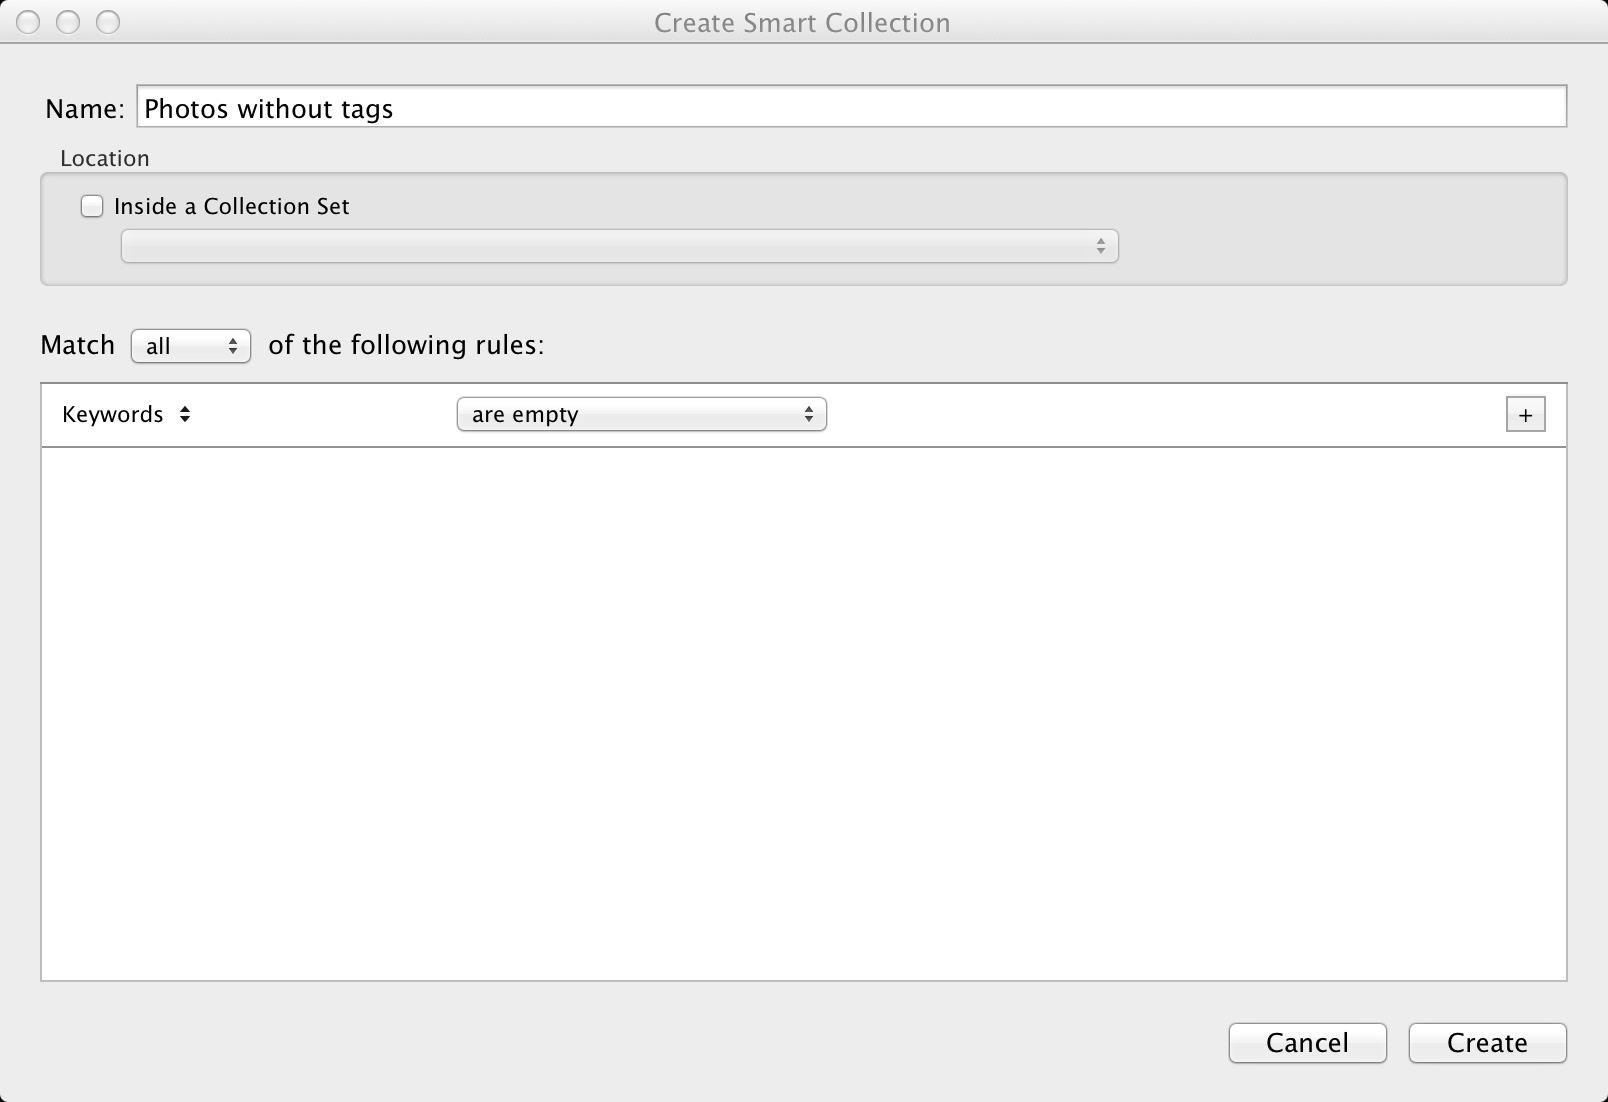
When I started sorting out my photos my catalog contained about 70000 pictures. To find the photos that are untagged I created a Smart Collection first. To do so select the option New Smart Collection... from the menu Library.
In the window that will open you can create a set of rules for this collection. To select untagged photos use the settings as shown in the picture below:


Click Create. In the "Collections" left side bar a smart collection will appear called "Photos without tags". In my case it contained about 3000 pictures (I have blurred the rest of collections just for clarity of this explanation):

In the next step the contents of this smart collection have to be copied to a temporary collection (I'll explain the reason for that in a moment). The easiest way is:
1. to select all the photos in the smart collection
2. to create a collection (menu Library->New Collection). In my case I have named it "Temporary - without tags". I have selected the option "Include selected photos" to make this collection in one shot:

So at this stage I have my working collection where the actual tagging will take place:

Why did I create a regular collection, next to the Smart collection? The reason is that the Smart collections are calculated in a dynamic way. So after every manipulation of a photo being part of the smart collection Lightroom checks if the Smart Collection selection criteria still apply. If not, the photo is automatically removed. In our case it would mean that we could manipulate a tag only once per photo. Directly after confirmation of the tag, the photo would disappear from the collection. Sometimes there are more tags required, sometimes we just make a mistake. Sure, Ctrl-Z (Command-Z) would rescue the situation, but we want to work efficiently, eliminating unnecessary mouse clicks and keystrokes.

Tagging photos quickly, just with a keyboard

The key to speed-up tagging is not to use the mouse (or touchpad) nor to type the keywords during the tagging. It is possible in Lightroom to tag the photos just by using the cursor keys, the Alt (Option) key and the numerical keys. Here is how.

Keyword sets

Lightroom offers the simple tagging tool, called a Keyword set. It is visible in the right panel of the Library module:
You can create as many Keyword sets as you want. Each keyword set has a name (in this case Outdoor Photography) and can contain up to 9 keywords.
The nice thing is that Lightroom assigns a keyboard shortcut to each keyword in the active Keyword set. Just select a photo, press Alt (Option) key and observe the Keyword Set panel:

Notice the small numbers (from 1 to 9), that I circled with red. These are the keyboard shortcuts that you can use to tag the photo! So if I wanted to apply the keyword Spring to a photo, I just need to press Alt (Option) and 4 key to place a tag. So no typing the keyword, no searching it on the list. Just Alt-[number].
It gets even better. With the combination Alt (Option)-0 you can change the selected keyword set. Alt-0 moves forward on the list of sets, Shift-Alt-0 moves backward.

Adding multiple tags is straightforward: just take different number. Remove the selected tag is done by pressing Alt-[number] again (in other words Alt-[number] toggles the tag).

So, provided you have prepared meaningful sets, the tagging is very quick: Change the selected photo with a cursor key, press Alt-[number key] to place a tag. If you don't have the tag in the current set, select another with Alt-0 or Shift-Alt-0.
If your tags don't contain the keyword you need, I suggest to skip such photo just for now and move on. Your Smart collection that you have created for watching untagged photos will remember it. In practice after finishing of quick tagging the number of untagged photos will be small enough to tag them manually in a limited time.
Creating the Keyword sets is explained next.

How to create a keyword set

Use the menu Metadata->Keyword Set->Edit... In the dialog that will appear type the keywords that you want to use:
If you are modifying the set, just press Change. To create a new set click on the list Preset and select the option Save Current Settings as New Preset.
Type the name of the preset in the dialog window, press Create. Finally press Change. Your new set is ready to use.


 The efficiency of the method

When I started with this method I had about 7000 untagged photos. In 6 hours I was able to tag 4000 photos in a meaningful way. I believe, it is not bad al all.


11 Mar 2014

On practicing the "semi-professional" photography - take the chance of an assignment

Doing a 'real', professional photo session is something I always wanted to try. There is however a problem - how to get such assignment not being a professional photographer? One solution is to actively search for them, starting in your own environment. Look for the opportunities by asking your family, friends, close acquaintances. It has some clear advantages: you are known to them, most probably they probably know your work, so you are not completely out of the comfort zone.
I have tried this approach lately. Everything started with an e-mail from my relative, asking for sharing of  a web shop of the jewelry made of glass, amber and metal.
When I saw the page I noticed two things: a real beauty of the offered products and not so good quality of the pictures showing them. So I thought "hey, I can do it better".
So I shared the page but asked if the jewelry maker wouldn't like to have better photos of his products.
After getting a positive answer I had my assignment.
I have arranged the session at the 'customer' premises and spent couple of hours photographing his products. We both had a lot of fun; I learned a bit about his craft, he was really thrilled by the results of my work.
It wasn't the real professional work, since I haven't earn a penny. But it was a "win-win" situation anyway. I have learned new aspects of photography, he got decent pictures of his products.


Next assignment will be much more challenging - a wedding of a good friend of mine. I'd better do it right, because I don't want to loose a friend :-). So I've been practicing for several months already.

15 Feb 2014

First photography DIY project of 2014 accomplished

Recently I have started the DIY project, which should end in the big (1x2m), sturdy  frame with detachable light diffuser or reflector, depending on the used fabric. The project is finished, and the result looks quite nice:
Front side

Back side
To check the quality I took several shoots using different materials: a shoot-through umbrella, a diffuser and the combination of two. All shots have been taken with the light source placed 1 meter from my face. I have used one SB-900 speed light flash, working in iTTL mode. I have compensated the light strength of the iTTL by -2 stops. The photos are not super sharp, because I had to operate the setup alone, using the remote trigger. So the lens focus was locked and I tried to keep the same distance from the camera during consecutive shots:
Shoot-through umbrella
Diffusser

Shoot-through umbrella + diffuser
First photo is the least successful in my opinion (let's not discuss quality of the model :-)). Note the blemishes on the chick and relatively high contrast around the ears. Second picture, taken with the screen only improves the blemishes.
The combination (putting the speed light behind the umbrella and the screen) produces the results which are to me most pleasant with respect to the softness of light. The idea of combining both light modifiers comes from Joe McNally (one of his online courses). Just to give an idea of the setup:


The diffuser gives a slightly warm color cast comparing to the umbrella, but it is not a big problem.
I have ended up with the budget for the whole project of about 70 EUR. Not bad, I'd say, considering the final effect.

4 Feb 2014

A potentially useful tip for all interested in practicing the Brenizer technique

No, it will not be yet another post about the Brenizer method. If one wants this kind of information, use Google or (even better), look at the instructions of the author of this technique.
Although it sound simple, it requires some practice before achieving repeatable decent results (at least, I still learn it). Just to mention a few aspects:
- Learn to pre-visualize the final composition,
- Choose the right focal length and the distance to the subject,
- Learn to move the camera properly during taking the shots.
The bottom line of this is that it will require quite some sessions and panoramas to be stitched.
And here comes the tip: at least in the initial phase choose the stitching software that works fast. Just to be able to judge the results quickly and move on.
I have started with Photoshop and its Photomerge function. It delivers good results, but it is slow, especially if the number of photos grows. There are alternatives based on the SIFT algorithm. They work amazingly fast. Autostitch is very simple to use, free, but with the limited functionality. Another that I have tried is Autopano Pro. It works also very fast and offers a lot of post processing options. It is not free, but the demo version is more than enough to practice the Brenizer technique.

26 Jan 2014

First photography DIY project of 2014 started

There is a light-shaping tool that I really would like to have in my bag. It is a big light diffuser/reflector/screen. By "big" I mean something with the dimensions 1x2 meters, for instance.
There are dozens solutions available on the market which one can buy. It is an option, but the available solutions are quite expensive (starting from around 200 EUR). So I decided to give a try and create such tool by my own. 
Basically it consists of a frame with a proper dimensions, a handle and the fabric which is stretched on the frame. Depending on the fabric the tool can be used as a reflector, diffuser or a screen.
There are many descriptions of how to make it on Internet, I have used this one as a starting point.
I have set some requirements for the final product before start:
1. It should be substantially cheaper than available products
2. It should be lightweight,
3. It should be portable,
4. It should be easy to mount (with limited number of parts)
5. It should be extendible and flexible (i.e. I wanted to be able to easy build frames of different sizes if needed, like 1x1m, 2x2m.

First part is accomplished. This weekend I have finished building the frame:
My requirements are realized, at least for the products based on a frame:
1. It cost 44.60 EUR (in the Netherlands). The price of similar products of Lastolite or Sunbounce are at least twice as much. 
2. The frame weights less than one kilogram.
3. It fits in a bag of 115x30 cm
4. It consists of 7 elements:


5. With the current set I can make a 1x2m frame as well as 1x1m:

The next step is to prepare the materials. I'll start with the diffuser.

Final note: there are collapsible reflectors/diffusers available on the market in the similar dimensions, starting from 49.95 EUR (google for Godox 150x200 for example), which are all-in-one packets (flexible (collapsible) frame, fabrics, bag). My project cannot compete with them on price. 
But I think that the frame is more versatile, since you can mount it on a stand. And it is easier to hold by a person if required.

18 Jan 2014

After a workshop with teenagers - some fresh thoughts

I have just finished a workshop about basics of photojournalism, news and reportage photography.
The audience were Polish teenagers (between 11 and 15 years) that had made a mini-reportage about their school, discussed the quality of their work and got some information about most important aspects of photojournalism: what are the rules the photo journalists must obey, what are the most important attributes of this kind of photography.
Looking at the age of the audience one can say that it is a "Facebook" or in general "Digital media" generation - surrounded by digital pictures all the time. There are different opinions about this phenomenon, but quite often people argue that it leads to the "photographic analfabetism" - young people cannot read the pictures anymore.
To be honest, I was also curious whether the group would be able to distinguish the vital aspects of the news and reportage photography.
To my surprise, they knew (or felt the importance of) quite a lot of issues of the contemporary photojournalism. For example they knew very well what the "photo setup" means (in contrary to the natural scene), they realized the importance of privacy. They knew about digital image manipulation and where it is applied mostly.
I see it as a positive side of the overall presence of digital media. Somehow together with it there is probably also emerging self-consciousness of the young consumers who are able to sort out what is real and what not and when is it ok or not.


11 Jan 2014

Back to Lightroom 5

It happens every now and then that we have to take our words back. I have to do it as well. But in this case I do it with a lot of pleasure. On my previous post on Lightroom 5 I have written about the issues with the stability and the performance of this version.
Recently I gave it a second try, this time with the version 5.3 of this application.
I am very pleased with the improvements Adobe made in this version. There are no stability issues, no unexpected crashes. The performance (as perceived by me) is very similar to the version 4.x.

So I decided to switch definitely to the Lightroom 5. 

8 Dec 2013

Shooting an event with two cameras - first observations and learnings

I have a new photographic experience behind me. Yesterday I was shooting almost the whole day with the two cameras. Before the event, I was considering shooting with just one and change the lenses if required. More on these considerations here.
During the event it turned out that switching the lenses is not an option. There were too many interesting things happening simultaneously. Just to give an example: at the certain moment there were children playing in a gym on two fields, two different sports. A very nice opportunity to capture some team movements and take a number of nice close-ups. But since the games were of short duration and I wanted to take photos of as many children as possible, I couldn't afford swapping the lenses.

I equipped my Nikon D80 with 24-70 f/2.8 lens and my D800E with 70-200 f/2.8. Next to it I put SB-900 on each of the cameras. There was not coincidence in such choice. Since my intention was to capture lots of faces I wanted to reach maximum quality for the close-up or tightly composed photos. For the scenes with a broader angle of view I could sacrifice some quality since my intention was to take pictures of groups of scenes implying more distance to the subjects and less details in the scene.

During the day I have made some observations with respect of using two cameras:

  • It is easier to carry them than I thought. I was a bit worried about how to take care of two cameras. After all it was not such big issue. One camera (D800 with 70-200 lens) was hanging on my right arm (I use a very decent strap of OptechUSA which was sticking to my arm very well). The other camera was hanging on my neck.
  • Keeping the settings simple helps a lot. I was trying to keep the settings of both cameras as simple as possible so I didn't have to think too much about them when switching between the cameras. So I set them both to manual mode, and when I was using flashes, I set them to the TTL mode. In the lighting conditions that I had it worked very well.
  • Knowing the camera limits is very important. Different cameras have different limitations. It is very important to know the limits and not get tempted to apply settings from the camera with higher possibilities to the 'weaker' one. A good example is setting the ISO. D800E can very easy handle ISO sensitivity of 2000. When one tries to apply such ISO to D80 will get very disappointing results. I stayed with ISO of max 640 on the D80, knowing it is more or less the highest value still delivering pictures with acceptable noise level. 
  • Don't forget to synchronize the clocks of both cameras. I unfortunately forgot to do so. As a result I got quite mixed set of photos when I have stored them in Lightroom. Sure, the time offset can be corrected in the software, but it cost time. So next time I will do better.
  • Divide the load between two cameras is good for batteries. Especially the flash batteries. I didn't have to change the batteries of any flash. While shooting with one camera during a comparable event, I have to change them at least once. It is logical but the consequence is that I don't loose the time on battery change.
All with all it was an interesting experience that I will be practicing more during interactive, time-intensive events.

6 Dec 2013

Gearing up for a shooting day - a checklist

Tomorrow I will be shooting photos at the "Sinterklaas" day, organized each year at the school of my wife. As usual there is a lot of things planned for this day, happening at several locations during the day. And as usual I try to capture most of the day with my camera and make nice pictures.
This year there are four events planned: sport games for the youngest children, a meeting with book writer, information fairs for the Polish parents living in the Netherlands, a buffet serving specialties of the Polish cuisine. All in the timeframe of 3 hours.
Next to that I got an assignment to make portraits of parents that actively support organization of such events. Usually there are 6-8 people to capture. And not to forget the "Sinterklaas" walking from one class to another.
From experience I know that coming with a camera and just shooting does not deliver the best possible results. So I prepared a checklist of things that help me to organize myself for such day.

Choose the gear

Since the day will be filled with quite dynamic events, some of them organized in the places with not so great light, I choose in this case for fast, light lenses. It will be more gear to carry, but the alternative would be an universal 18-200mm, f/3.5-5.6 lens which might not work well in all situations. Next to that I will most probably shooting with 2 cameras (I will take 2 and make the final decision on location) 


Prepare lighting equipment

Normally I would just take one speedlight with me, just in case. However, to make nice portraits I will also take a softbox on a stand which should give me together with off-camera flash a nice light source. I will take the backup speedlight as well just to have a backup

Arrange enough backup for the photos

This is something I always consider before the assignment. Will it be enough to take just spare memory cards? Should I take a laptop to dump the pictures during the day? For tomorrow I will go for an option with the laptop. The reason is simple: since the sport event will be photographed, it implies a lot of shots. 

Know the agenda of the day

To move efficiently and be on time during most important moments I have noted the agenda of the day. I put everything in my smartphone so I am sure I will get notified on time about next important event.

Scout the location in advance

This is again about efficiency. For the location of tomorrow's shoot I don't need actually to do it since I know the place very well. But in all other cases I would be on location before the actual event starts to orient myself.

Take some sandwiches and water

It is not directly related to photography, but during such intensive day some nutrition is needed to keep the body energized.