23 Dec 2014

Photographing a wedding - what could I have done better?

This is the last post of the series about my assignment I did some months ago. I have written about different aspects in part 1, part 2 and part 3. Today I will try to summarise most important improvement areas. Just to remember about them in the future.

Have a second shutter

Capturing all important events during the wedding is difficult, sometimes even not possible. I had one moment that I had to be at two places simultaneously. And I of course couldn't. After the ceremony, best man and best woman were signing the marriage certificates (which deserves a picture). At the same time the couple obtained best wishes from the priest. Being focused on the couple I had to skip the moment of putting the signature by the best woman. The second shutter would solve the problem easy. 


Mind the background. All the time

First plane is important. But the background can weaken (or even ruin) the picture. Just a few examples.

In the picture above there is everything in place on the first plane: beautiful woman, nice light, great moment of joy. But the background works distracting. It would have been better to move the camera just 40-50 centimeters left, and a little bit down. Just to have only one wall of the room as a background.

The above picture has a wooden frame on the left side that works distracting. Again, moving the people just a few centimeters to the right would solve the problem.

At last, an example of the great moment where a lot of joy and love is going on between the bride and groom. If only the fragment of the building wouldn't be captured... To be honest, that was just a first test shot to check the lights. And because I have noticed the cluttered background I could correct it in the latter shooting.
Note that to some extent those kind of mistakes can be corrected in the post processing. But it cost a lot of time and is not always possible.

Mind all the guests

While the wedding focuses on the bride, groom and their closest relatives, in my opinion it is important to capture also as much as possible material that will document the day in the future. For this occasion I have realised that I didn't put enough attention to the guests in the church. I simply didn't capture all of them! Luckily I had all the important persons in picture, but still - I could have done better.


Some technical challenges (and my solutions to them) experiences during photographing a wedding

It is time to catch up a bit with my notes on the photographic journey. In this post (being continuation of part 1 and part 2) I'll give some examples of the technical challenges I saw, together with my solution to them.

1. Low light, moody scene

That was one of my primary concerns. It's because the couple planned a very important moment during the ceremony that started with... complete darkness. Guests were standing in a room, handling small candles in their hands (not enlighten yet). The couple walked in a room with a candle and gave a light to each quest. So gradually the whole room become enlighten by a 'travelling candle light'. It was beautiful, very symbolic and powerful ceremony. And challenging to capture it right. To make it right I have taken some precautions:
- I ensured a right spot for shooting: by putting a small stair-ladder in the corner of the room I placed myself beyond the heads of other guests. So I ensured the clarity of view
- I ensured the full control about the exposure. Therefore I used a light meter in incident mode, before the ceremony started. I simply took a candle, put a light meter in the distance of 50-60 centimeters from it, directed the incident meter in the direction of the candle. Took a measure. This 50-60 centimeters was my estimation of the distance between a candle held by the couple in front of them and their faces. Measured exposure was the one I was intended to use. Then I put my camera in the manual mode with the settings given by the light meter. I liked the effect:


2.  Fast changing scenes

This is just given. While the ceremony in church is predictable, things at the reception might be surprising every now and then. And I had to be prepared. To deal with it I was walking with two cameras. One equipped with 24-70 mm lens, another with 70-200mm lens. Just to be able to cover as much as possible with the optical range. The disadvantage of such approach is weight to carry but at the end it paid off.

3. Unattractive light

Something to always take into account. I have used an extra light source, being speedlight flash which I placed on a monopod who was carried by my assistant. To trigger it I have used the radio triggers from PocketWizard (FlexTT-5 system for Nikon). I must say it worked very well. I practically didn't miss any shot. And I have much more flexibility in comparison to the iTTL system of Nikon.

4. Getting the right content for a photo album

This last one is on a boundary between technical and 'human-related' one. When taking the assignment I had the end product in mind, being a photo album (which was meant as a wedding gift for the couple). So I had to produce a content that fits well into such album. The thing was that the couple was not so keen on taking much of the extra effort to organise a separate session. To solve it I took an 'easy going' approach (betting that it would work): I suggested (without specifying a time frame) just a small walk during the ceremony to a location nearby the wedding venue. Luckily they didn't know that there was a nice, long pier going into the sea. So they got curious about the location and I had a few nice shots.


1 Sept 2014

Once more about shooting the wedding (what the teachers don't tell)

Let me start with the disclaimer first. This post is not a rant. On contrary, let me start with saying couple of nice words about people who shared their knowledge about wedding photography online and this way teached me how to start. Cliff Mautner, Jerry Ghionis, David Ziser, Frank Salas are photographers whom I follow via KelbyOne, their blogs and other stuff on Internet. All of them are great teachers and I am sure they are 100% integer. After watching their courses and reading what they publish one can know how they shoot photos they have in their portfolio. They reveal all photographic knowlegde, tips and tricks. So my great thanks to you, guys.

The thing is that they teach about photography. Which is perfectly fine and this is what aspiring photographers (like me) want. A wedding is means not only shooting photos for a couple of hours. It is an enterprise taking 10-14 hours of time on location. So there are couple more things next to photography to think about.

Nutrition

Sounds simple, but it is better to plan the meals during the day. During my assignment I had a luxury having my lovely wife at my side who took care of this aspect. So even if I was busy, she ensured that during short breaks I had a right stuff on my plate. Since I was also a guest of the bride and groom during the wedding, it was quite easy to arrange that. But in general I think it is better to organize things upfront and be prepared. Depending on the place and the local customs I can imagine that it even could require some contractural agreements with the bride and groom.

A place for the gear

Even if I planned my equipment for the wedding to be as lightweight as possible, I needed a safe place to store some stuff that I didn't need at the moment. Again, my situation was comfortable since I had a hotel room just next to the place where ceremony was organized. But in general - it is a good idea to think about it in advance. 
So, why it is not mentioned during the classes about wedding photography?
I think the reason is simple: for the instructors - all being practitioners for tens of years - it is like breathing for all of us. So it is probably just so obvious that it is not worth mentioning. And strictly speaking it is not about photography. 


30 Jun 2014

Preparing for the wedding shooting session - how I have dealt with uncertain situations

This is the second post about my big photo assignment I have taken couple of weeks ago. As usual, when doing unusual photography assignments I always prepare as much as I can. For the wedding I had couple of special reasons:
- for a number of scenes I had only one chance to take a photo (the bride and groom say 'yes' only once),
- wedding photography was (and still is) quite a new territory for me,
- I was not so familiar with the ceremony and the rituals celebrated in the church,
The most important reason was to deliver the best possible photos I could make. And good preparation would help to minimize the need of improvisation.
Sure, I know that it is impossible to plan everything. There would always be surprises and unplanned situations. And that is fine. But by preparation I'd like to create a room for improvisation (if needed) to get an excellent picture. And not to improvise to get the picture at all.
So here comes my list of preparations I took. All of them helped. There are also some things I could have prepare better. Something to remember and apply for next time.

  1. Get to know the program of the day. The easiest but the most crucial part of the preparation. Talk to the couple, make a list of events during the day, but don't forget to note the times. For me it was kind a frame where I could put my photographic activities. Having that I could see for myself how much room I had for shooting. In case of this wedding it became clear that there will be no room at all for a real shooting session with the couple alone. After some consultation we agreed not to push for it and accept if such photos couldn't be made.
  2. Scout the locations. I did it twice. First, by studying the church and the wedding room based on the pictures available on Internet. Then, a day before wedding I have been on both locations with my camera to see the places in 'the real'. It gave me answers on a lot of questions. For example: how the light is distributed along the aisle and where to take the position for the 'walk-in' photo. How the altar is lit, is there enough light for shooting without a strobe? 
    The same held for the place of reception. Short inspection of the surroundings gave me new inspirations for a shots of the couple. I discovered a nice pier that almost always opens nice possibilities of a good, moody shot.


  3. Learn how the ceremony would look like. In this case it was double important: first of all I was quite unfamiliar with the order of events during the ceremony. Second, this specific wedding was extended with a lot of elements that are not normally present. Again, talk with the bride and groom helped a lot. Next to that I studied the Internet and the official prescriptions of the Catholic Church. And I visited the real ceremony short before the wedding to get a better feeling on how it looks. This gave me eventually a lot of confidence and also a little extra time that I could use to take some less conventional shots, like this one:


  4. Check local laws and customs. It does not have to be an issue, but I was aware that the Catholic Church in Poland officially requires a kind of certificate from the photographers who want to take photos during the devotion. And formally a priest can even refuse admittance of a photographer who doesn't have such document. For me it was not possible to arrange such document in a short time. Again, the couple solved it for me, by talking to the master of ceremony. But in general case it could be a 'show stopper'. How did I know that it might have been an issue? Well, simply by thinking ahead about things that might go wrong. 
  5. Make an overview of photos that are compulsory. For an occasional wedding photographer as I am it is really a 'must have'. Since just a list is rather boring and uninspiring, I have created a 'mood board': quite large sheet of paper with the characteristic wedding pictures that I found on Internet. I put it on the wall in my living room for a couple of weeks and each day I studied it a little bit. Next to that I also drew a lighting setup for the specific photo and discussed it with my assistant.
  6. Get to know people involved in the preparations. This is something I need to organize better next time. The biggest mistake was not to talk in advance to the master of reception. As a result the program of the reception was to me totally unknown and I had to follow the flow of events quite blindly. In the course of reception we have aligned 'the agenda' several times so it was corrected somehow, but in the beginning I was rather walking behind the facts. That was the part when I had to improvise to get decent photos. I think I delivered the results, but it was not fun and not very professional. 
  7. Talk with someone about the plans. Here I used great help of my lovely wife (who was also my shooting assistant during the day). We have discussed different aspects of the day, pointed the possible risks and limitations of the different ideas.
  8. Study, study, study. I cannot stress it enough. I have watched and read quite some amount of materials available on Internet or in the books. There are dozens of places where I could find the information, so it is impossible to mention all of them. Let me just mention Kelby One, who hosts video courses of great wedding photographers, like Cliff Mautner, David Ziser, Jerry Ghionis. Photography Life is another source I visit regularly (btw, their scope is much broader than wedding photography only).
  9. Practice, practice, practice. Here I mean not only photography skills (it is obvious - I have to learn the craft to deliver (at least) decent shots and deliver them repeatedly). But shooting a  wedding involves a lot of communication with, well, mostly strangers. During this communication I had to guide them, to pose them, simply to become a 'director' of the scene. Since I am rather an introvert person, this kind of interaction is not the easiest thing for me. And it is not something that one can learn overnight. To me it took some time to learn at least the basics and I had different occasions to exercise it in the past. But is it enough? To check it I had to be creative and opportunistic. Couple of weeks before the wedding our friends came to visit us. One of them is a trainer specialized in interpersonal communication and development of communication skills. So I simply asked her for help. I offered her and her partner to make couple of nice photos of them but asked her to observe me during the session and point out the things that I could do different or better with respect to communication and guidance. It was simple, but very efficient. I got some very good tips, they got nice photos. And I felt much more comfortable during the wedding.
  10. Prepare the gear properly. This will be the topic of one of the next posts, so I let it here.

15 Jun 2014

The biggest photo assignment of this year (so far)

Last week I had a pleasure of shooting the wedding of my friends. It was a quite big assignment, since we agreed to shoot the "full package" — from the preparations starting in the morning,  till the wedding reception late in the night.
It was a busy, dynamic and very interesting day — in all kinds of aspects, including photographic ones.
Was it easy? Well, yes and no. An easy part was the contact with the bride and groom - I know the bride for years and it was quite straightforward to establish and maintain a good contact with her during the day. The groom turned out to be a great guy. Since the couple is truly in love I had plenty of moments where the good emotions, like love, joy, devotion were just popping out of them.
There were of course difficult moments I had to deal with. The reception was conducted in a quite high tempo, with a lot of situations to be captured. There was no time during the day to organize a shooting session with the couple. So I had to deal with artificial light in the evening. The wedding ceremony took place in a catholic church with a lot of rituals and moments that were quite new to me. So I had to find a way of making good pictures despite my ignorance of the religious matters.
I still don't know if my assignment is successful (first, I wait for the feedback from the couple about the photos; second — the final product, which is the wedding album is being edited).
Nevertheless I think it is worth spending some time on writing down observations that I have made and lessons that I have learned.
In the coming posts I'd like to write about:
- preparations for uncertain situations,
- lessons that are not taught during courses of wedding photographers,
- technical challenges and solutions
- things that I could have done better

29 May 2014

On using light meter

After quite some consideration and reading a lot of stories on the Internet I have decided to give it a try and bought a light meter (Sekonic D758DR). Did I have a direct need to have one? To be honest — no. But I learn photography and I know that I need to understand better how the light works to enhance my pictures. And the accurate light measuring device can help me with the learning process. Another motivation was the observation that I have to adapt the exposure of quite a lot of photos in the post processing. This is quite tedious, especially when the photos are taken in big series (like a shool event, a wedding, etc.).
Using the light meter efficiently takes some practice. Luckily there are tons of materials which help to start. After some small (mostly technical) issues were solved the light meter became a very useful tool.
Here is where I use it most till now:

  • Examine the dynamic range of the scene while shooting landscapes. It is a real time saver, since often it turns out that using the bracketing and exposure blending in post processing is simply not necessary. Without the light meter I used to take 2-3 photos in bracketing mode ("just to be sure"). 
  • Making portraits. Here the light meter rocks. Really. Period.
  • Learning the light. Another important aspect for me. With the light meter in hand I can quickly validate my ideas about the light intensity and learn to estimate them better.
  • Find out the influence of the light modifiers on the exposure. With the light meter I have measured how the light modifiers that I use (for example my big diffuser) limit (absorb) the light, which in turn speeds up my decisions how to expose the scene when such modifier is used.
First tangible results of using the meter are also becoming visible. I have noticed that I indeed spend less time in Lightroom adapting the exposures of my photos. Which gives me time for other activities.

6 Apr 2014

Tagging photos efficiently in Lightroom (with help of Keyword sets and keyboard shortcuts)

One of the features of the Library module of the Adobe Lightroom is the possibility of tagging photos stored in the catalog. Tags, next to collections, are invaluable when a photo has to be found quickly. The issue with tags is that they require some discipline to maintain them and to ensure that all the photos are tagged properly. Probably the best way to keep the catalog well tagged is to apply the tags to the photos during import or just thereafter. Otherwise the number of untagged photos just grows over time. This article is about dealing with a lot of untagged photos in a catalog in a efficient way, by using only the keyboard and not to type keywords at all during tagging.

Find the untagged photos

When I started sorting out my photos my catalog contained about 70000 pictures. To find the photos that are untagged I created a Smart Collection first. To do so select the option New Smart Collection... from the menu Library.
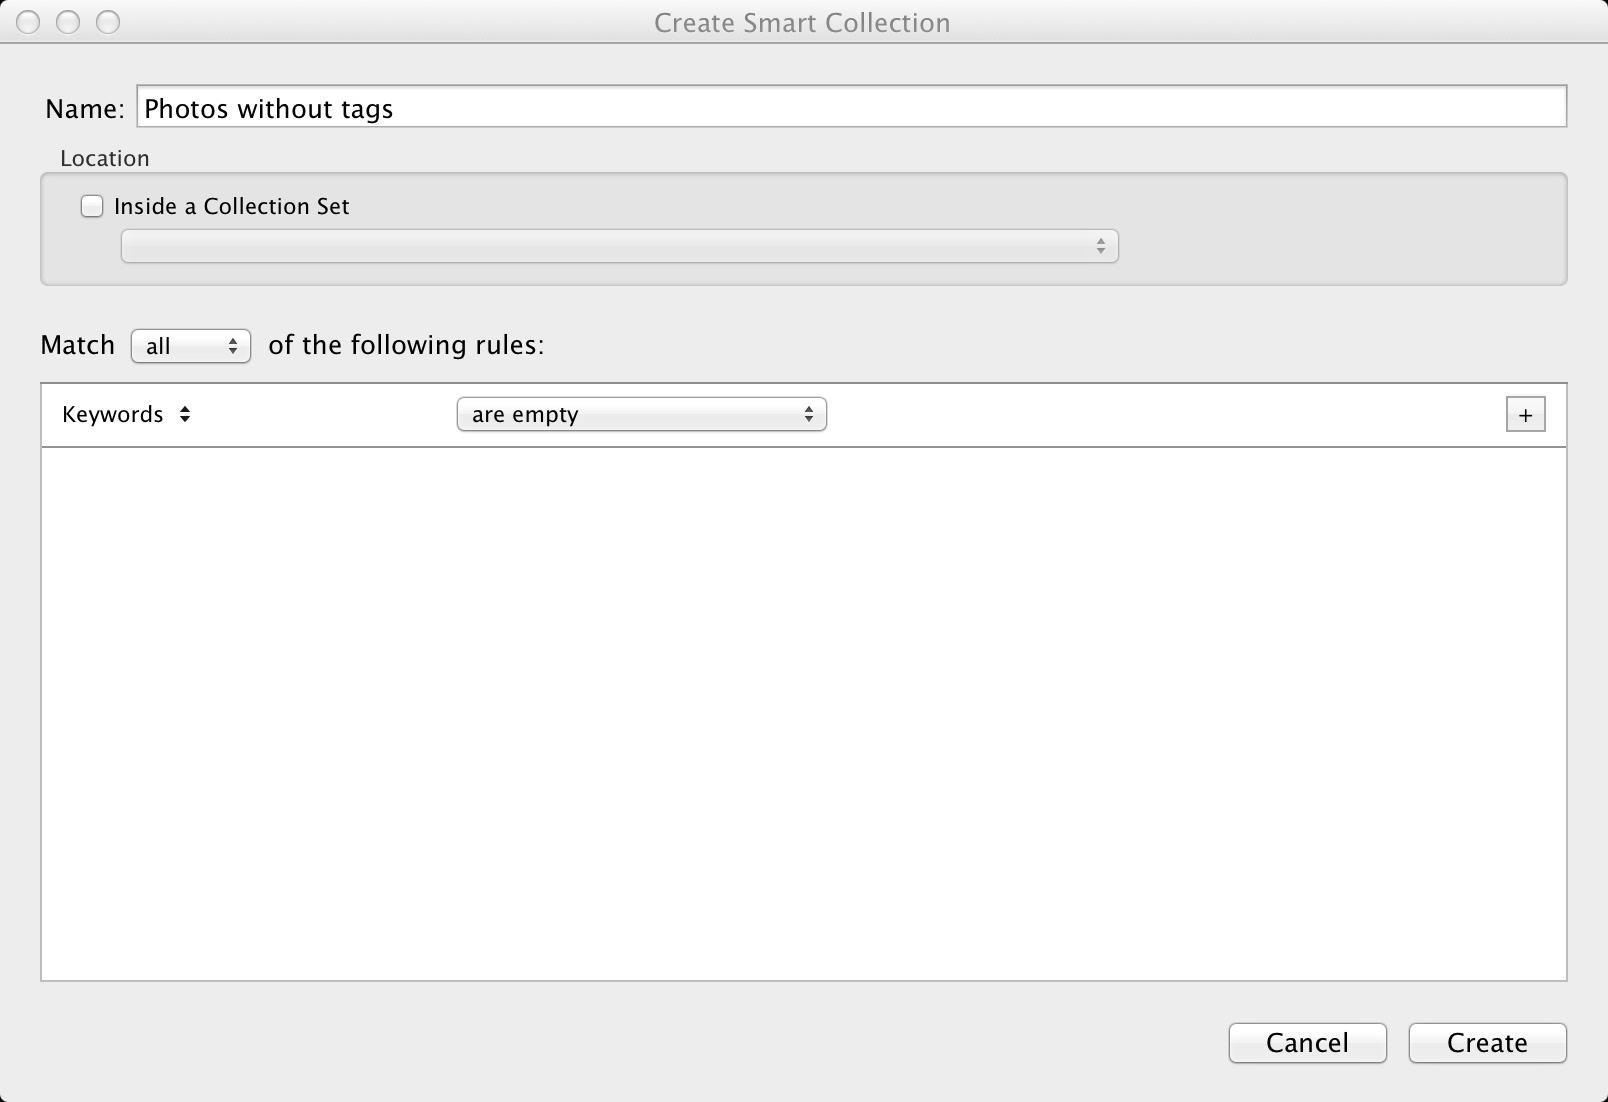
In the window that will open you can create a set of rules for this collection. To select untagged photos use the settings as shown in the picture below:


Click Create. In the "Collections" left side bar a smart collection will appear called "Photos without tags". In my case it contained about 3000 pictures (I have blurred the rest of collections just for clarity of this explanation):

In the next step the contents of this smart collection have to be copied to a temporary collection (I'll explain the reason for that in a moment). The easiest way is:
1. to select all the photos in the smart collection
2. to create a collection (menu Library->New Collection). In my case I have named it "Temporary - without tags". I have selected the option "Include selected photos" to make this collection in one shot:

So at this stage I have my working collection where the actual tagging will take place:

Why did I create a regular collection, next to the Smart collection? The reason is that the Smart collections are calculated in a dynamic way. So after every manipulation of a photo being part of the smart collection Lightroom checks if the Smart Collection selection criteria still apply. If not, the photo is automatically removed. In our case it would mean that we could manipulate a tag only once per photo. Directly after confirmation of the tag, the photo would disappear from the collection. Sometimes there are more tags required, sometimes we just make a mistake. Sure, Ctrl-Z (Command-Z) would rescue the situation, but we want to work efficiently, eliminating unnecessary mouse clicks and keystrokes.

Tagging photos quickly, just with a keyboard

The key to speed-up tagging is not to use the mouse (or touchpad) nor to type the keywords during the tagging. It is possible in Lightroom to tag the photos just by using the cursor keys, the Alt (Option) key and the numerical keys. Here is how.

Keyword sets

Lightroom offers the simple tagging tool, called a Keyword set. It is visible in the right panel of the Library module:
You can create as many Keyword sets as you want. Each keyword set has a name (in this case Outdoor Photography) and can contain up to 9 keywords.
The nice thing is that Lightroom assigns a keyboard shortcut to each keyword in the active Keyword set. Just select a photo, press Alt (Option) key and observe the Keyword Set panel:

Notice the small numbers (from 1 to 9), that I circled with red. These are the keyboard shortcuts that you can use to tag the photo! So if I wanted to apply the keyword Spring to a photo, I just need to press Alt (Option) and 4 key to place a tag. So no typing the keyword, no searching it on the list. Just Alt-[number].
It gets even better. With the combination Alt (Option)-0 you can change the selected keyword set. Alt-0 moves forward on the list of sets, Shift-Alt-0 moves backward.

Adding multiple tags is straightforward: just take different number. Remove the selected tag is done by pressing Alt-[number] again (in other words Alt-[number] toggles the tag).

So, provided you have prepared meaningful sets, the tagging is very quick: Change the selected photo with a cursor key, press Alt-[number key] to place a tag. If you don't have the tag in the current set, select another with Alt-0 or Shift-Alt-0.
If your tags don't contain the keyword you need, I suggest to skip such photo just for now and move on. Your Smart collection that you have created for watching untagged photos will remember it. In practice after finishing of quick tagging the number of untagged photos will be small enough to tag them manually in a limited time.
Creating the Keyword sets is explained next.

How to create a keyword set

Use the menu Metadata->Keyword Set->Edit... In the dialog that will appear type the keywords that you want to use:
If you are modifying the set, just press Change. To create a new set click on the list Preset and select the option Save Current Settings as New Preset.
Type the name of the preset in the dialog window, press Create. Finally press Change. Your new set is ready to use.


 The efficiency of the method

When I started with this method I had about 7000 untagged photos. In 6 hours I was able to tag 4000 photos in a meaningful way. I believe, it is not bad al all.