One of the features of the Library module of the Adobe Lightroom is the possibility of tagging photos stored in the catalog. Tags, next to collections, are invaluable when a photo has to be found quickly. The issue with tags is that they require some discipline to maintain them and to ensure that all the photos are tagged properly. Probably the best way to keep the catalog well tagged is to apply the tags to the photos during import or just thereafter. Otherwise the number of untagged photos just grows over time. This article is about dealing with a lot of untagged photos in a catalog in a efficient way, by using only the keyboard and not to type keywords at all during tagging.
Find the untagged photos
When I started sorting out my photos my catalog contained about 70000 pictures. To find the photos that are untagged I created a Smart Collection first. To do so select the option New Smart Collection... from the menu Library.
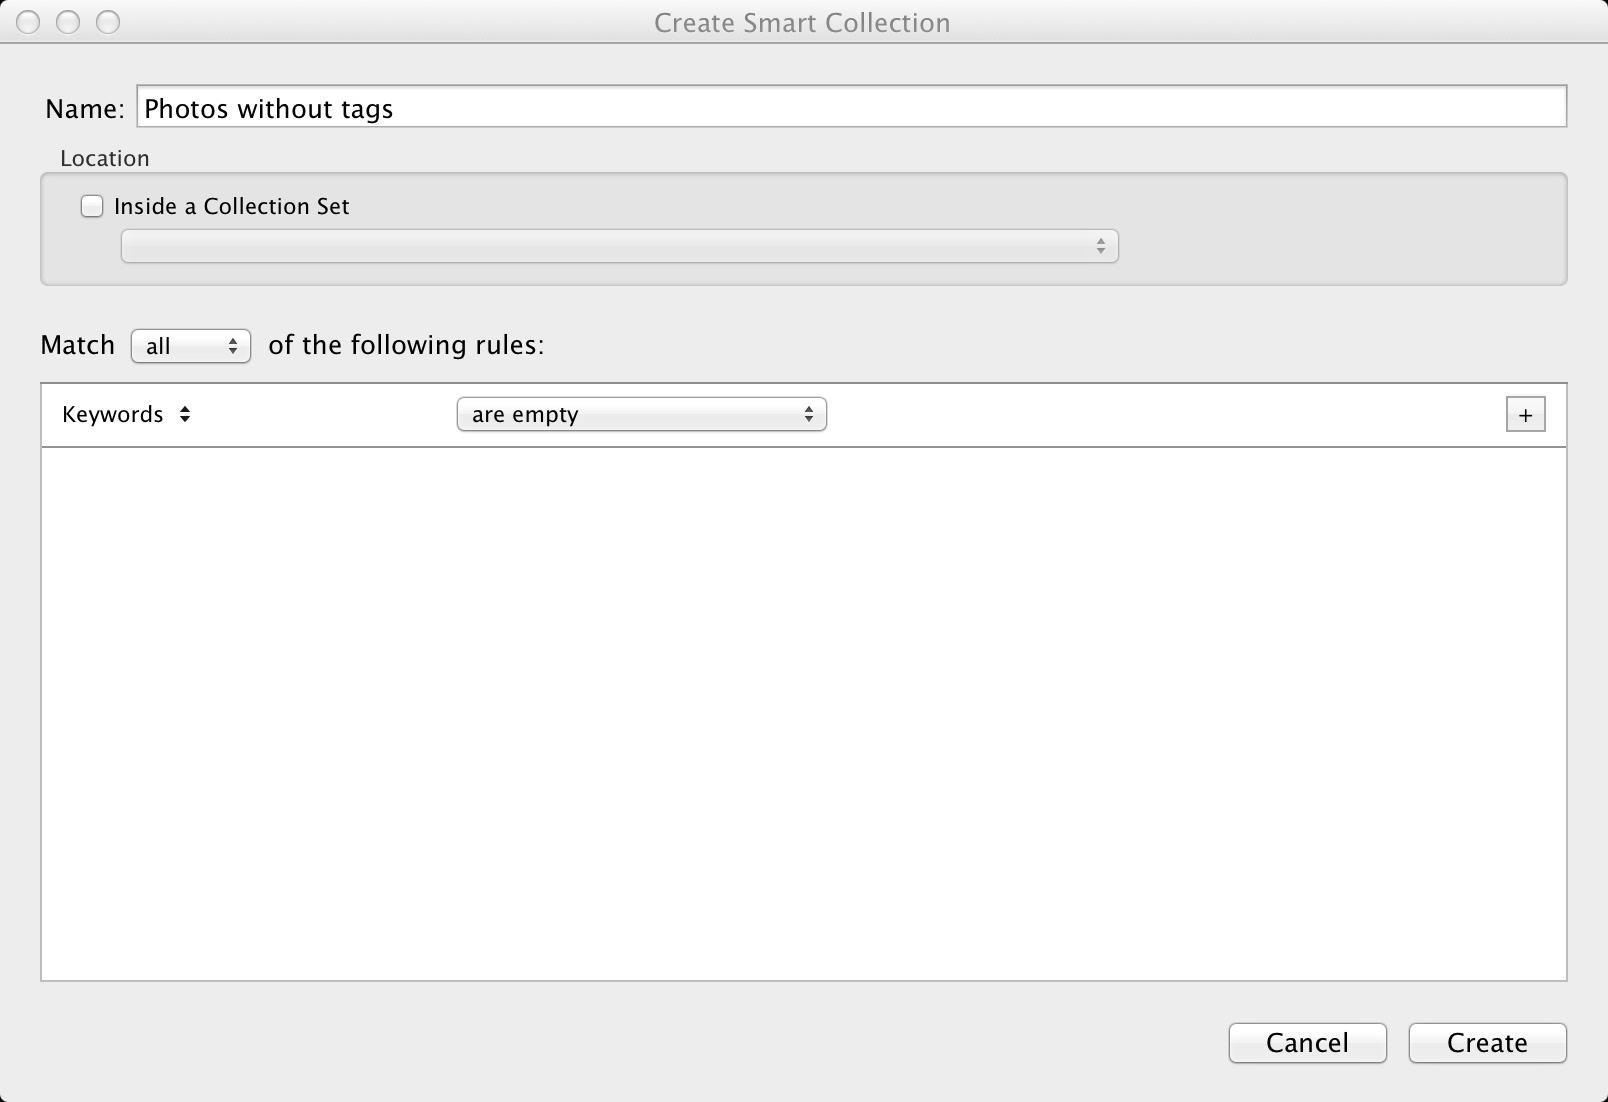
In the window that will open you can create a set of rules for this collection. To select untagged photos use the settings as shown in the picture below:
Click Create. In the "Collections" left side bar a smart collection will appear called "Photos without tags". In my case it contained about 3000 pictures (I have blurred the rest of collections just for clarity of this explanation):
In the next step the contents of this smart collection have to be copied to a temporary collection (I'll explain the reason for that in a moment). The easiest way is:
1. to select all the photos in the smart collection
2. to create a collection (menu Library->New Collection). In my case I have named it "Temporary - without tags". I have selected the option "Include selected photos" to make this collection in one shot:
So at this stage I have my working collection where the actual tagging will take place:
Why did I create a regular collection, next to the Smart collection? The reason is that the Smart collections are calculated in a dynamic way. So after every manipulation of a photo being part of the smart collection Lightroom checks if the Smart Collection selection criteria still apply. If not, the photo is automatically removed. In our case it would mean that we could manipulate a tag only once per photo. Directly after confirmation of the tag, the photo would disappear from the collection. Sometimes there are more tags required, sometimes we just make a mistake. Sure, Ctrl-Z (Command-Z) would rescue the situation, but we want to work efficiently, eliminating unnecessary mouse clicks and keystrokes.
Tagging photos quickly, just with a keyboard
The key to speed-up tagging is not to use the mouse (or touchpad) nor to type the keywords during the tagging. It is possible in Lightroom to tag the photos just by using the cursor keys, the Alt (Option) key and the numerical keys. Here is how.
Keyword sets
Lightroom offers the simple tagging tool, called a Keyword set. It is visible in the right panel of the Library module:
You can create as many Keyword sets as you want. Each keyword set has a name (in this case Outdoor Photography) and can contain up to 9 keywords.
The nice thing is that Lightroom assigns a keyboard shortcut to each keyword in the active Keyword set. Just select a photo, press Alt (Option) key and observe the Keyword Set panel:
Notice the small numbers (from 1 to 9), that I circled with red. These are the keyboard shortcuts that you can use to tag the photo! So if I wanted to apply the keyword Spring to a photo, I just need to press Alt (Option) and 4 key to place a tag. So no typing the keyword, no searching it on the list. Just Alt-[number].
It gets even better. With the combination Alt (Option)-0 you can change the selected keyword set. Alt-0 moves forward on the list of sets, Shift-Alt-0 moves backward.
Adding multiple tags is straightforward: just take different number. Remove the selected tag is done by pressing Alt-[number] again (in other words Alt-[number] toggles the tag).
So, provided you have prepared meaningful sets, the tagging is very quick: Change the selected photo with a cursor key, press Alt-[number key] to place a tag. If you don't have the tag in the current set, select another with Alt-0 or Shift-Alt-0.
If your tags don't contain the keyword you need, I suggest to skip such photo just for now and move on. Your Smart collection that you have created for watching untagged photos will remember it. In practice after finishing of quick tagging the number of untagged photos will be small enough to tag them manually in a limited time.
Creating the Keyword sets is explained next.
How to create a keyword set
Use the menu Metadata->Keyword Set->Edit... In the dialog that will appear type the keywords that you want to use:
If you are modifying the set, just press Change. To create a new set click on the list Preset and select the option Save Current Settings as New Preset.
Type the name of the preset in the dialog window, press Create. Finally press Change. Your new set is ready to use.
The efficiency of the method
When I started with this method I had about 7000 untagged photos. In 6 hours I was able to tag 4000 photos in a meaningful way. I believe, it is not bad al all.


