Showing posts with label lightroom. Show all posts

6 Apr 2014

Tagging photos efficiently in Lightroom (with help of Keyword sets and keyboard shortcuts)

One of the features of the Library module of the Adobe Lightroom is the possibility of tagging photos stored in the catalog. Tags, next to collections, are invaluable when a photo has to be found quickly. The issue with tags is that they require some discipline to maintain them and to ensure that all the photos are tagged properly. Probably the best way to keep the catalog well tagged is to apply the tags to the photos during import or just thereafter. Otherwise the number of untagged photos just grows over time. This article is about dealing with a lot of untagged photos in a catalog in a efficient way, by using only the keyboard and not to type keywords at all during tagging.

Find the untagged photos

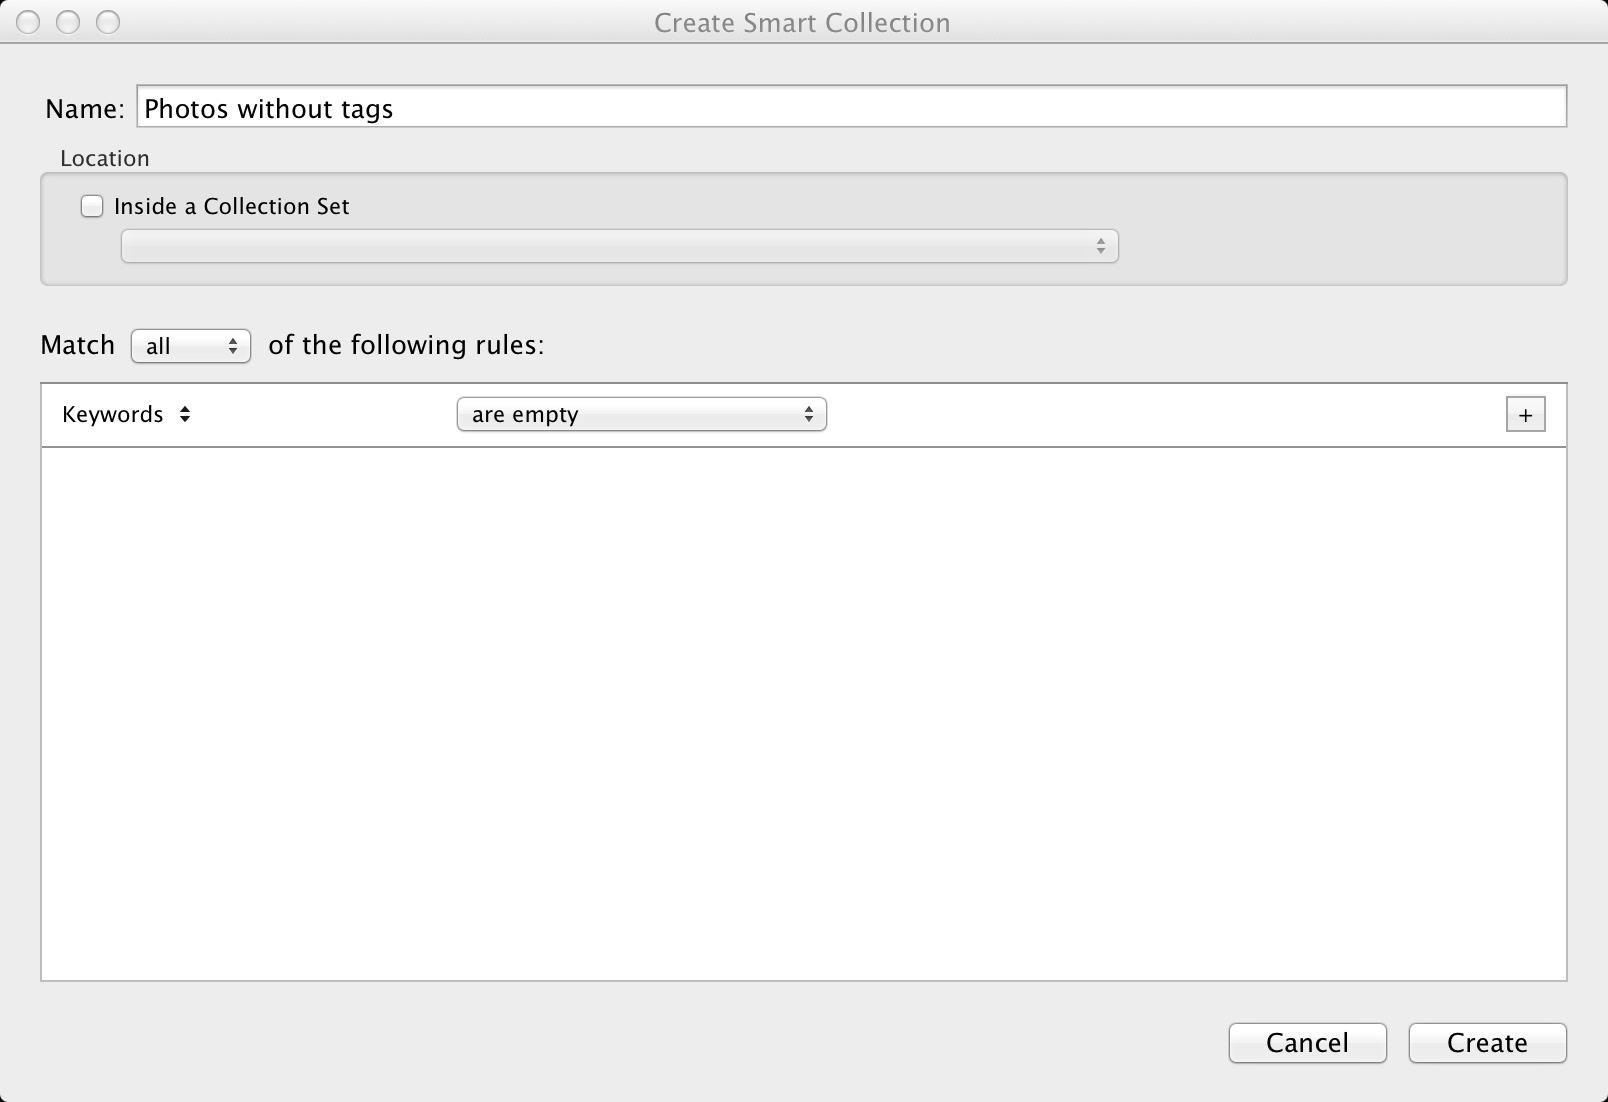
When I started sorting out my photos my catalog contained about 70000 pictures. To find the photos that are untagged I created a Smart Collection first. To do so select the option New Smart Collection... from the menu Library.
In the window that will open you can create a set of rules for this collection. To select untagged photos use the settings as shown in the picture below:


Click Create. In the "Collections" left side bar a smart collection will appear called "Photos without tags". In my case it contained about 3000 pictures (I have blurred the rest of collections just for clarity of this explanation):

In the next step the contents of this smart collection have to be copied to a temporary collection (I'll explain the reason for that in a moment). The easiest way is:
1. to select all the photos in the smart collection
2. to create a collection (menu Library->New Collection). In my case I have named it "Temporary - without tags". I have selected the option "Include selected photos" to make this collection in one shot:

So at this stage I have my working collection where the actual tagging will take place:

Why did I create a regular collection, next to the Smart collection? The reason is that the Smart collections are calculated in a dynamic way. So after every manipulation of a photo being part of the smart collection Lightroom checks if the Smart Collection selection criteria still apply. If not, the photo is automatically removed. In our case it would mean that we could manipulate a tag only once per photo. Directly after confirmation of the tag, the photo would disappear from the collection. Sometimes there are more tags required, sometimes we just make a mistake. Sure, Ctrl-Z (Command-Z) would rescue the situation, but we want to work efficiently, eliminating unnecessary mouse clicks and keystrokes.

Tagging photos quickly, just with a keyboard

The key to speed-up tagging is not to use the mouse (or touchpad) nor to type the keywords during the tagging. It is possible in Lightroom to tag the photos just by using the cursor keys, the Alt (Option) key and the numerical keys. Here is how.

Keyword sets

Lightroom offers the simple tagging tool, called a Keyword set. It is visible in the right panel of the Library module:
You can create as many Keyword sets as you want. Each keyword set has a name (in this case Outdoor Photography) and can contain up to 9 keywords.
The nice thing is that Lightroom assigns a keyboard shortcut to each keyword in the active Keyword set. Just select a photo, press Alt (Option) key and observe the Keyword Set panel:

Notice the small numbers (from 1 to 9), that I circled with red. These are the keyboard shortcuts that you can use to tag the photo! So if I wanted to apply the keyword Spring to a photo, I just need to press Alt (Option) and 4 key to place a tag. So no typing the keyword, no searching it on the list. Just Alt-[number].
It gets even better. With the combination Alt (Option)-0 you can change the selected keyword set. Alt-0 moves forward on the list of sets, Shift-Alt-0 moves backward.

Adding multiple tags is straightforward: just take different number. Remove the selected tag is done by pressing Alt-[number] again (in other words Alt-[number] toggles the tag).

So, provided you have prepared meaningful sets, the tagging is very quick: Change the selected photo with a cursor key, press Alt-[number key] to place a tag. If you don't have the tag in the current set, select another with Alt-0 or Shift-Alt-0.
If your tags don't contain the keyword you need, I suggest to skip such photo just for now and move on. Your Smart collection that you have created for watching untagged photos will remember it. In practice after finishing of quick tagging the number of untagged photos will be small enough to tag them manually in a limited time.
Creating the Keyword sets is explained next.

How to create a keyword set

Use the menu Metadata->Keyword Set->Edit... In the dialog that will appear type the keywords that you want to use:
If you are modifying the set, just press Change. To create a new set click on the list Preset and select the option Save Current Settings as New Preset.
Type the name of the preset in the dialog window, press Create. Finally press Change. Your new set is ready to use.


 The efficiency of the method

When I started with this method I had about 7000 untagged photos. In 6 hours I was able to tag 4000 photos in a meaningful way. I believe, it is not bad al all.


25 Nov 2013

Newest Adobe deal for Photographers (valid till 2nd December 2013) - take or leave it?

Adobe has a limited time offer, called Adobe Photoshop Photography Program (valid till 2nd December 2013), which offers a bundle of Photoshop CC and Lightroom via a Creative Cloud (CC) monthly subscription of 9.99$ (in Europe it is priced 12.29EUR per month). There was (and is still ongoing) a lot of discussion on Internet about the new business model of Adobe. I am not going to discuss pros and cons of such model. Instead I am going to present some considerations taking different user categories into account.

New users

For someone that does not have Photoshop and Lightroom it is probably a good deal. For 120$ (147.5EUR) per year one gets those two packets. CS6 and Lightroom 5 bundle if bought separately, would cost 848$ (699 and 149 for Photoshop and Lightroom, respectively). So the subscription price would exceed the purchase costs of the standalone version after 7 years. This of course under assumption that the subscription price remains the same.
The added value is that the upgrades of the software are included in the subscription price of the Creative Cloud. And in the period of 7 years one can expect 2-3 release updates of both products.
So for the newcomers it is in my opinion the interesting option.

Existing users

If someone (like me) has purchased Photoshop CS6 and Lightroom, then the benefits of such deal are not so obvious. Let's face it: Photoshop CS6 is very extended package and most photographers don't even need the updates (there are people still using CS2 and CS3 with a great success and pleasure). And update of Lightroom will be available as a standalone application for 79$. 
So for the sake of switching to CC I would not take this deal. 
But there is one more aspect that makes it interesting for at least some of us.

Users using two different OS platforms (Windows and Mac)

If someone has both a Windows and a Mac machine and wants to use Photoshop and Lightroom on both platforms, then he/she should seriously consider the offer from Adobe, in my opinion. Why? Because the licensing model of Photoshop (prior the CC version) does not allow to use the same license for two machines equipped with two different operating systems. In this case Adobe offers either purchase of two licenses (which means 699$ extra) or the so called platform swap. But platform swap is not an option since the usage of software is limited to one machine.

For the CC version the situation is different: one can install the software on two computers, disregard the operating system they run. More on that in this discussion thread.
So for 120$ per year one gets the software running on both platforms. For me this is a deal maker.


18 Aug 2013

Lightroom 5? No, thank you (at least for now)

A while ago the Lightroom 5 has been released by Adobe. Since it is my application of choice for my photography workflow I wanted to test the new version. It contains quite some nice features that would make the post-processing even more efficient and better, just to mention the most important to me:
- True healing brush (not only spot removal tool),
- Circular mask,
- Image skew correction tool

With the new versions of any software product one needs to be a bit cautious: it might not be the best software the developers were intend to deliver. That is why we have "minor" version upgrades over time of almost each software package nowadays.
So I downloaded the trial and started playing with it. Actually, since it was time of my family portrait assignment, I decided to use the new version for postprocessing them.

Unfortunately, Lightroom 5 does not deliver a quality I got used to it with this product. There is an obvious regression at two areas: stability and performance.
With Lightroom 5 I experienced crashing of the application during regular activities: something I have never seen in previous versions (Lightroom 3 and Lightroom 4). Luckily the results of my work were never lost, but it slowed down the processing a lot.

Then the performance: using spot removal tool or healing brush tool was practically impossible in my hardware configuration. I was unable to move the brush smoothly over the photo, effects of applying the brush were visible on the photo only after several seconds after the movement - really not workable scenario.

I admit, my hardware (Windows 7 64-bit, quad core i5 processor with 6MB RAM) and photos that I take (36 MPixels) are challenging for efficient processing, but Lightroom 4 is a lot faster and more stable than the new product of Adobe!

So I decided not to purchase the newest version. I'll wait till they address performance issues. Final note: I am not alone having such experience, check out this blog.

2 Jul 2013

First communion session part 3: Post-processing and printing preparation

This is third article about photographing of first communion. In previous posts I wrote about different aspects of preparation and actual shooting.
In this part I will share some thoughts about my approach to post processing and I'll show some techniques that I have used.

Make the candidate photos available for selection as soon as possible

I have shared the photos with my client very soon after the session. Purposely. The idea was to let the family enjoy the photos and to start making a final selection at the moment when the session is still fresh in the memory of participants. And it payed off. I got a number of good questions about some photos that I initially skipped from the selection. They were technically not very good, but were liked by the participants. 
It is worth noting how the photos were shared. I have used my account on 500px for this purpose. I just created a set, uploaded the photos, protected the set with a password and shared with the client. 

Having short time for processing of the photos forced me to make some tradeoffs during image post-processing. There is simply no time for advanced processing. And at this moment I learned how important is to get photos "right in the camera". The less cropping, retouching, exposure compensation required, the less time is spent behind the computer's monitor.

Communicate about expected number of pictures to be selected

From the beginning I have specified the number of pictures I would like to have in the final paper album. I have chosen initially this number to be 1/5 of the published photos. It was a good compromise between a final price and the content of the album. Another purpose of the limitation was of a more psychological nature. I wanted the family to choose the best photos. Since the number was limited, they was forced to think and choose the really best photos. 
To be honest I am not sure if it is the right approach when dealing with a real customer, but in this case it worked.
Later on I got a request to add some more photos, since they liked them a lot. Of course, I agreed.


Think about album's composition. Let review it.

At the end there will be a paper version of an album, and it would be nice if the album is built as a book telling a story. So the composition is as important as when taking a single photo. In this case the story is relatively simple: preparation for the ceremony, sceneries in church with a communion reception as a climax, then a number of family portraits after the ceremony.
I have shared my thoughts and initial versions of the album with my wife, who has a very good eye for compositions consisting of more pictures. It helped me a lot to make right choices of the images on the album pages.

Plan a review meeting with the customer

When album was ready in a digital form, I made an appointment with mother of the girl to show her the work and the final proposal. We identified some mistakes in the selection of the photos (just wrong numbers of the photos), agreed to add two pages to the album with two important photos, finalized the agreement on the actual price. I think that it was important for both parties: for her to increase confidence, for me to confirm that the job was done right.


Technicalities. Tools used. Techniques applied

For album creation I have used Adobe Lightroom 5.0, Nik Software suite, onOne Software 7.5 (and Photoshop). My choice was driven by the fact that Lightroom is my photo collection organizer of choice. Nik Software I have used primarily for its RAW presharpener tool (which is in my opinion way better than Lightroom's sharpen tool) and Viveza tool which allows for selective applying simple image adjustments (color cast, exposure, contrast) to the parts of the image. I have used onOne software to improve the portraits photos with their Perfect Portrait tool. This tool performs a really nice job in whitening the eyes and mouth and has a very nice algorithm to correct the skin tone.
Every now and then I used some presets of Color Efex Pro 4 (Nik) and Perfect Effects Pro 4 (onOne) to quickly achieve cool effects offered by the presets implemented by those applications.
Using the plugins I have noticed that it is more comfortable to work with them via Photoshop than directly in Lightroom. So I opened the image to be edited in Photoshop, then I applied tools that I wanted to use and finally saved the modified .PSD file. I found it more comfortable because of fact that Nik and onOne integrates with Photoshop by using layers (each tool application adds a new layer). Which gives extra possibilities since I can apply layer masks, layer effects and all other goodies of Photoshop.

Finally the book. I decided to use Blurb for printing, because of their good quality and integration with Lightroom. I found however the possibilities of book editing in Lightroom (even in version 5.0) somewhat limited: positioning of texts on the page is quite limited, it is not possible (at least to my best knowledge) to create frames in the Book module of Lightroom. I had to use external applications to provide a frame to a photo. It delayed the whole production process for sure. Let's hope it will get better in future versions of Lightroom.


In the last part of this cycle I will describe some learnings I have taken from the whole process.


26 Mar 2013

Make your own Easter greeting card

Easter is coming and it is a good habit to send the greetings to the friends or relatives on a greeting card. Since couple of years I make such cards by myself, which is a lot of fun and gives the cards uniqueness and personal touch.
Last year I described some techniques useful for this kind of photography. In this post I am going to describe the whole process of making such card, from the basic concept, to the publication.

Easter theme

All starts by selecting the basic theme. The symbolic of Eastern is focused on the symbols of new life: eggs, chickens, green and yellow colors, hare. So it is almost unavoidable to have at least some of them on the card. In my first attempt I have chosen for eggs and chickens. 

The composition

I like postcards that have a 3D-look. So I wanted to compose a picture that would give strong impression of depth. To achieve that I set up the scene in three planes: foreground, with the eggs, middle part with the chickens, and the background with the hanging eggs:


The perceived depth of field can be manipulated by different aperture settings.

The light

The above picture was taken in the ambient light, coming from the window located right to the scene. I wanted to give the chickens some warm punch as key light. To do so, I have used two speedlights with the CTO filter placed left and right to the chickens:


To avoid light spilling both strobes were equipped with a snoot to focus the light beam. Both strobes were controlled from the camera build-in flash via the iTTL system of Nikon. First attempt:
The chickens are warmly lit, but the rest of the scene is dark. Too dark. Time to put the fill light. Fill light was been created by third flash and a golden reflector bouncing the light from the flash on the scene. After applying fill light the scene looked like that:
That is better. The scene still have a warm look and all elements on the foreground are properly lit. Last step is to improve the light in the background. To do so another flash was used, equipped with the yellow filter. I have experimented with several positions of the background flash:
Manipulating the background light was easy, I just held the flash light in my hand during shooting in the different places of the scene.
Finally I have chosen the middle image for further processing.

Post processing

For post processing I have used combination of Lightroom, Nik software suite and Photoshop.
In Lightroom I have applied lens profile and camera corrections.
In Nik software I have pre-sharpened the image (with RAW sharpener), applied the golden reflector filter, blur vignette (in Efex Pro), added some local brightness to the eggs in the background (with Viveza)
In Photoshop I have removed some distracting spots. There is the final picture:

Some technicalities

Reuse the setup

The whole 'production' took me about 3 hours. Since a lot of effort has been put in the light setup once the chickens were ready I decided to create another card, with a hare in the main role:

As one can see, the scene is very similar to those with chickens, yet different. Taking this picture took me just couple of minutes thanks to reuse of the existing setup.

Try different gels

When I was done with my basic setup I have tried to light the scene with flashes without gels:
It hasn't been chosen eventually but it is always worth experimenting with different settings and sometimes it can result in a new, inspiring scene.

Hanging eggs

To hang the eggs I have used a combination of the flash light stand and a piece of other pipe mounted on the light stand:


8 Jul 2012

Project D800E - after first serious assignment

It was a while since my post about preparing for shooting with D800 in low light conditions. Short after publishing it I was able to test most of the ideas described there. The occasion was the end of school year gala at the school where my wife teaches. Because it was my first shooting assignment with D800 I played safe and prepared the setup for low lighting conditions.
Then the event started as my assignment did. Very quickly it turned out that I don't have to boost the light. D800 was able to produce the images with acceptable noise (more about it in a second) using only the ambient lighting:

I will not write about the fantastic dynamic range of the D800 and the autofocus possibilities. It is already written more than enough about it. What I'd like to do instead is to discuss the workable limits of the sensitivity in such conditions. By workable I mean a combination of shutter speed vs ISO (assuming constant aperture) allowing to take the sharp pictures. The 'safe' shutter speed minimizing the risk of motion blur I set to 1/125 s or higher. After doing initial tests my first bet was to go with ISO up to 4000 but no higher. Here there is an example explaining why.

When looking at the image in 1:1 scale one can see the significant noise in the background curtain as well as on the faces of the persons. Using ACR or Lightroom the problems can be helped to some extent:

The noise is reduced, but I started to loose the details in the picture. Explainable, because I needed to stretch noise reduction quite significantly in Lightroom:

So at this level of ISO one needs to start making compromises between the overall sharpness and the acceptable noise. My final touch on this picture was to use the "Sharpen for screen" with the "Amount" option set to "High" when exporting the image to JPEG. That improved the picture even further.
Final note: of course the value I have chosen is not an absolute truth, far from that. It is rather a guideline for this particular type of lighting (a moderately lit stage) and the type of scene (limited group of people on the stage). When one is going to shoot a close-up of somebody's face and the face would fill the frame, ISO 4000 might work just fine. 
If one wants to see more photos taken with D800E, please visit the school photo gallery. It is in Polish, but it is easy to start browsing through the photos just by clicking on the gallery thumbnail and then go back with the web browser's 'back' button. Or, by using the Google Translator.


17 Feb 2012

Small tip for working with sharpening in Lightroom 3

Sharpening tool in Lightroom Develop mode is a sophisticated and powerful one. Sometimes however it is difficult to judge what the effects of the sliders would be. By using sharpening sliders while having Alt key (Option on Mac) pressed Lightroom will display a Black and White view showing the effect of the slider. Let me show an example:
The photo above is applied a Masking with quite big value (77). But what it means for the processing exactly? Well, when you press the Alt key and move the slider, the image turns into black and white, showing the mask. Black areas are the areas unaffected by the sharpening tool, while white shows the areas where the sharpening is applied:


Moving the slider to the left (decreasing the masking) adds the sharpening to more more elements of the image:

You can use Alt key with all sharpening sliders (Amount, Radius and Detail). To me using it with the Amount slider seems to be quite useful. Look at the detailed view with a specified amount of sharpening:
The same fragment with Alt pressed:
Using the black and white view instead of colour helps to reveal the details of the texture better and apply the right amount of sharpening.
I hope someone will find it useful.

11 Feb 2012

Shooting a multi-portrait session in tethered mode - the impressions

Today I was shooting another multi-portrait session of several dozens of children (from age 0.6 to 6-7).
The setup I used was quite similar to the one I used earlier and described here. For today's session I decided to introduce a new element: a laptop connected to the camera, so I was able shoot in so-called tethered mode.
This way of shooting is adviced by a lot recognized studio photographers. Obviously it gives one clear advantage, one can judge the quality of a picture taken much better than on camera LCD. But I found out that there more advantages. More on that later, now some technical stuff.

Iteration one:
Tethered mode in Lightroom is not supported for Nikon D80. So in the first approach I have installed an "intermediate" application called Camera Control from DYIPhotoBits. It's free and it recognizes my Nikon D80, so the rest was easy: I configured the destination directory of Camera Control as a directory to be monitored by Ligthroom (In Lightroom choose File->Auto Import->Auto Import Settings... and then File->Enable Auto Import to start monitoring).
Then connect the camera via USB to the laptop (don't forget to set the USB port in your camera to the PTP mode). From now on, whenever a picture is taken, it gets saved by Camera Control, recognized by Lightroom and imported to the Lightroom catalog. There is one drawback of this approach: the latency time between shooting and getting a picture in Lightroom. So it was working, but is was not smooth (in my case it took 10-11 seconds from the shot to the file available in Lightroom for preview. Go to iteration 2


Iteration two:
The Camera Control Pro from Nikon is the application that was tested as second. For Nikon 80 version 2.0 didn't work, so after installation the immediate update to 2.8 was required. Luckily the trial version works for 30 days, so I could use it for the session. The application performance was a way better comparing to the solution from iteration one (the time from shutter release to having image available on the laptop was 2-3 sec). So this was chosen as a solution for the session

Advantages of tethered mode
Indeed, looking at a photo on a 15'' screen enables much better quality control than LCD. But there is more, much more. It gives you a possibility to interact nicely with the customer (in this case parents of the photographed children). And that is win-win situation: in my case parents could easily pick up the photos they liked, I could listen to their comments and learn what they actually like. Plus, I was able to take notes about extra wishes (like required number of prints) just in place.

Learnings and practical tips:

  1. Tethered mode is a way to go for studio sessions. I am fully convinced.
  2. Remember to secure the USB cable, especially in presence of small children. They really don't care about your stuff. So I fastened 30-40 cm of the cable to the floor with gaffer tape, so the chance of suddenly pulling it from the laptop (or dropping the laptop on the groud) by accidental stumble was minimized
  3. I was using 5m long USB cable which was enough and gave enough flexibility. 


26 Jan 2012

Getting something out of a rainy day - part 2

As said in previous post, I worked a bit more on the composition with rain drops.
Here are the results:

Both pictures were taken with Nikon D80, 18-200mm zoom lens @ 200 mm, f/14. time 1/200 and 1/320 s respectively. Photos taken with the camera mounted on a tripod.
To get the rain drops sharp I needed to focus manually. 

15 Jan 2012

First practical experiences with Lightroom 4

Lightroom 4 is made available by Adobe for beta testing. A number of presentations of new features, small (and big) improvements can be found on the Adobe page and a set of video presentations here.

What would work in practice for me? Is it worth upgrading (though the price of upgrade is not revealed by Adobe yet)? In this post I try to summarize the changes and enhancements that work best for me.

Develop module
The most noticeable difference is an extra slider for image intensity manipulation:
Lightroom 3 basic settings
Lightroom 4 basic settings


So basically the tonal range of an image can be manipulated in LR4 in four areas (blacks, shadows, highlights, whites, walking on the histogram from left to right), vs 3 areas in LR3 (blacks, fill light, recovery). After some experiments with the new sliders I can tell that it is a huge improvement (especially in the right part of the histogram).

Export to e-mail
LR4 introduces possibility of exporting the images to an e-mail address (File->Export, then select E-mail in the Export To drop down list). This feature is nice for two reasons:
- It speeds up the workflow in the situation where the photos are sent to someone for the review, for example.
- It makes easier to use LR as a photo sharing application (next to photo processing and archiving application). In my particular case when my wife wants to send photos I made and stored in LR, I need to export them, store in a place where they are available for a e-mail application so she can send it). This feature makes the whole process unnecessary.

Map 
Map module makes geotagging of the photos kind a fun. It is a matter of dragging a photo to a location where it was taken. That's it. One can also load a track log file (in a .gpx format) to further ease the process.
What I miss is an option of tagging multiple photos from a track log file. Luckily a great LR plugin exists for this purpose, available on Jeffrey Friedl's blog.

So Adobe did (again) a good job by extending possibilities of image manipulation. And they modernized the LR with respect to sharing photos features. Now awaiting for a Export to Google+ plugin.