4 Feb 2012

Experiences with night (and winter) photography

Since winter came finally to The Netherlands and it rather doesn't stay long here, I'd like to take each opportunity to take some winter pictures. This week due to the other assignments I hadn't time to shoot during the day. So the idea was to try something new - night photography. I'll not be writing about the obvious, like: use tripod, take longer exposure times etc. Instead, I'll show a process of getting to the final pictures with some learning moments.
First photo was taken in the city in a park. As one can see, no much color there, so in post processing I added a bit saturation to the greens and oranges to emphasize the tree which is reflected in the water a little bit. Another trick here is a vignette to let the tree come more to the foreground.
Another remark: as one can see the sky is white here. Well, in the real life it is not the case. Nowadays because of using sodium light for the street lighting the sky gets orange-ish color looking pretty ugly (at least almost) if you ask me. In this case simple white balance correction over the whole image solved the issue.
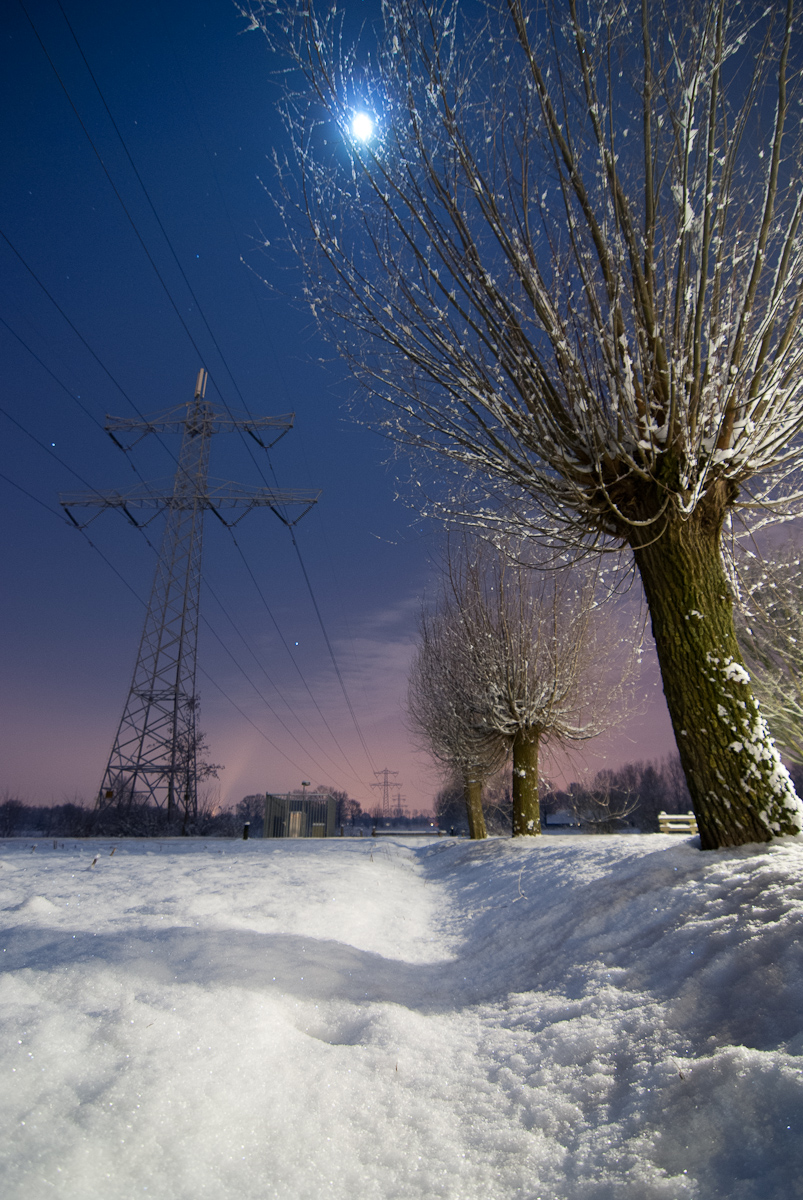
Then another scenery, from last Friday. The snow was fresh, it was cold, there was almost full moon, so probably good conditions to take some pictures. I took two lenses: Tokina 11-16 and Nikons 18-200 with me. Then I started shooting with the Nikon lens:
Original idea was to get a lonely tree in the picture and let the snow be good emphasized. The result is, well, not as I wanted. Then I have noticed a nice cloud formation above the tree. Another lens (switched to wide-angle Tokina), another effect:
Since the photo has been taken at the outskirts of the city, the light pollution effect was much less and I didn't  have to correct it. In contrary, here it worked in my advantage, creating an interesting gradient from dark blue to orange.
Then some learning moments: 
1. Forget the auto-focus (at least it didn't work in my Nikon D80). Manually focusing on something specific is also problematic, because you don't see much through the viewfinder. Then focus on infinity and you should be fine in such situation. But: in which direction should I turn my focus ring? Which brings me to the next point.
2. Know important aspects of your engine. When it's dark you need just to know how to setup basic parameters without having to look too much. In my case I used my smartphone to enlight the lens and choose proper focusing distance. But when you do it at -12 degrees it is not fun. 
3. Take a light source with you. In my case a smartphone was enough

Then another sceneries. This time I wanted to capture the moon:
 Here again the clouds help to make the picture a bit more interesting. And I liked the composition with the power lines (this is something I cannot deny - I like them). Another picture with power line:
Light is coming from a street lantern.
Finally, some shots from the city, at a channel. 
I started with quite wide-angle scene but then I decided to narrow it to emphasize the ship more.
 Last picture I liked because of the mixed colors created by various lights.
 Some last remarks:
After shooting in the snow think about your engine aftercare. Snow is nice, but snow is just water. So unfold your tripod at home, let it dry for couple of hours. The same for lenses and body. Take it out of your bag, put on a desk, let dry. Let your bag open as well and let moisture evaporate.


26 Jan 2012

Getting something out of a rainy day - part 2

As said in previous post, I worked a bit more on the composition with rain drops.
Here are the results:

Both pictures were taken with Nikon D80, 18-200mm zoom lens @ 200 mm, f/14. time 1/200 and 1/320 s respectively. Photos taken with the camera mounted on a tripod.
To get the rain drops sharp I needed to focus manually. 

21 Jan 2012

Getting something out of a rainy day

The raining in The Netherlands started some days ago and it seems that it will not stop for a couple of weeks. So how to find a motivation to get a camera, go outside, find some inspiration and take some photos during such period? Here's an approach I tried today and it worked for me.
I gave myself a little assignment: visualize rain and check out how a landscape changed by it can work in your advantage.
I started in my close neighbourhood and took it easy (I thought): find some raindrops, some puddles and go ahead shooting. First the raindrops:


It turned to be more difficult than I thought. First of all, the exposure times with ISO 200 were around 0.3-0.5 s. So the pictures are not very sharp. Tripod in this case was not very helpful because of the wind that moved the trees. Anyway, I think there is a lot of potential in this kind of composition so I'll give a try other day (and as I mentioned, I'll get a lot of opportunities to try it out :)).

Than the puddles. Experimented for quite some time and got something like that:

Probably not the most spectacular photo but good enough as a background for some other works.
I spent some time 'studying' the different ideas on how approach the pool and make something nice out of it. Like playing with the zig-zag like lines:
Or zooming in on the border of the pool:


Again, not very best, but something to keep in back of my head for the future.
Then while walking a little bit an idea came to my mind to use the puddles as the shapes forming part of the composition. Here the first shot:

The idea is: the puddles form a leading line to my bike that is supposed to be a main subject. The focal length is way too short (32mm), so let's make it longer to 'compress' the distance a little bit:
What about that? I think it is nice. O course the main subject could be more interesting (I wouldn't mind a red Ferrari), but it's about an idea. BTW: this shot has been taken with a focal length of 200 mm and I needed to walk about 30 meters away from the subject to get everything (the puddles and the bike) into the picture.
Finally, some abstraction:
What's that? The same position, shorter focal length gives the answer:

What I am going to explore further is to get better results on the rain drops (composition and technical-wise).  And go outside more often during rainy days!

Learned today:
- Tripod can be very handy with such weather, especially when doing close-ups. Low light conditions require longer exposure times which in turn requires a steady support of the camera. Higher ISO values may help, but in case of my gear (Nikon D80) going beyond ISO 640 doesn't make much sense (the noise becomes too visible), so - tripod to the rescue.


15 Jan 2012

First practical experiences with Lightroom 4

Lightroom 4 is made available by Adobe for beta testing. A number of presentations of new features, small (and big) improvements can be found on the Adobe page and a set of video presentations here.

What would work in practice for me? Is it worth upgrading (though the price of upgrade is not revealed by Adobe yet)? In this post I try to summarize the changes and enhancements that work best for me.

Develop module
The most noticeable difference is an extra slider for image intensity manipulation:
Lightroom 3 basic settings
Lightroom 4 basic settings


So basically the tonal range of an image can be manipulated in LR4 in four areas (blacks, shadows, highlights, whites, walking on the histogram from left to right), vs 3 areas in LR3 (blacks, fill light, recovery). After some experiments with the new sliders I can tell that it is a huge improvement (especially in the right part of the histogram).

Export to e-mail
LR4 introduces possibility of exporting the images to an e-mail address (File->Export, then select E-mail in the Export To drop down list). This feature is nice for two reasons:
- It speeds up the workflow in the situation where the photos are sent to someone for the review, for example.
- It makes easier to use LR as a photo sharing application (next to photo processing and archiving application). In my particular case when my wife wants to send photos I made and stored in LR, I need to export them, store in a place where they are available for a e-mail application so she can send it). This feature makes the whole process unnecessary.

Map 
Map module makes geotagging of the photos kind a fun. It is a matter of dragging a photo to a location where it was taken. That's it. One can also load a track log file (in a .gpx format) to further ease the process.
What I miss is an option of tagging multiple photos from a track log file. Luckily a great LR plugin exists for this purpose, available on Jeffrey Friedl's blog.

So Adobe did (again) a good job by extending possibilities of image manipulation. And they modernized the LR with respect to sharing photos features. Now awaiting for a Export to Google+ plugin.

14 Jan 2012

Let small object "hang" in the air (with no postprocessing and a lot of fun)

The idea described here came during preparing a set of Xmas postcards for our family and friends. I had a number of little Christmas decorations that together with other bigger subject could make a nice composition. The final product (one of several) looks like this:
So the decoration hangs in the air (which is a quite normal behavior for an angel) and candles below it lit the subject a little bit. No Photoshop (or other software) has been involved in this photo. The hanging effect is achieved purely mechanically. Here's how the concept basically works:

Scene setup in bird's view
The subject is supported by an aluminium pipe that is placed horizontally. Now if the camera lens is put at the same height as the hanging subject, the subject hides the pipe completely and we have a hanging angel (or Santa, or whatever):
Scene setup showing orientation of a camera w.r.t. the support and the  subject
The direction of the aluminium pipe doesn't need to be exactly horizontal. Important is that it matches the line of sight of the lens and the pipe remains invisible behind the subject.
When basis is done the rest is to choose a proper lighting for the subject and decide what to do with the background. If one wants to try the setup here are some practical tips:
  • As a support for the pipe I have used an Lastolite umbrella stand with hotshoe swivel. The hole which is normally used for mounting an umbrella was used to hold the aluminium pipe.
  • It is convenient to be able to regulate somehow the length of the pipe. I started with the length of 1.35m but then I realized that the subject is too close to the background and light doesn't drop enough with this distance to have a close to black background. A length of 2.4m worked well.
  • To mount the subjects to the pipe I have used a removable adhesive from Tack-It. But any brand of course would be good as long as the subject is not too heavy.
If you are interested let me know, I can upload some more pictures showing the details of the setup.


8 Jan 2012

Shoot portraits of 100 children in 3 hours (and get decent results)

It is becoming a tradition that around Xmas and new year a quite big photo event is organized at the school where my wife teaches. The idea is to take a 'Christmas-like' portrait of each child in the school and offer it to sell just before Chrristmas so the parents and grand parents have something memorable (next to the other gifts).
Each year it is quite extensive photo session, since there are 100+ children, each child is photographed twice (the whole silhouette, and a shoulder portrait), then there are always group photos: with best friend, with the whole class, with the group of buddies, etc.

This entry is not about shooting portaits. There are dozens of places where it is already described (like here).
What is not said very often though are the little details around the session that can save you a lot of time if applied. And the opposite applies as well: if forgotten, a lot of extra work needs to be done during and after the shooting.

Over the years I have established kind of a 'logistic workflow' ensuring that the session goes smooth and the children get their photos a week or 1 1/2 week after the session. Here are some things that work good for me:

  • Make appointment in advance. Inform the teachers about the event. Kindly ask for cooperation during the event
  • Plan the whole event. Ask for the day schedule in advance. You want to shot all the children being at school this specific day. Look at the schedule and check if it is possible, and how to order the classes.
  • Work with small groups. Try to avoid the situation when 20+ 7-years old boys and girls are running around (and sometimes across) the shooting setup. See also next bullet.
  • Ask for the assistance of some staff or parents. Believe me having 2 other adults that children are familiar with is priceless. They organize smooth flow of the groups, keep an eye on the group waiting for the shoot and they can assist immediatelly in case something unexpected happens.
  • Have a feminine assistant on location. For one important reason: women pay a lot more attention on the small details with respect to children hair, clothing and general look. And they can make 'last minute' small adjustments in a way that children accept it and feel comfortable.
  • Play safe with your setup. While it is tempting to start experimenting with your beautiful models (as children of all ages are), remember that there are 100 waiting for their shot. So what I use mostly is a simple lighting setup with a softbox at the front of a model and one to enlight the background or to create separation between a model and the background. Something like this:


  • Take a steam iron with you (no kidding). It happened to me that after unfolding the background and putting it on the stand there were creases going right through the background scene. Sure, you can remove them in postprocessing but remember: You'll have to postprocess 200+ photos. Believe me, after 10 of them it is not fun anymore. Ironing of the background will cost you 15-20 minutes.
  • Take a big, white sheet with you. When put on the window it can soften harsh light (you never know) and form a nice, additional light source.
  • Talk to children. Some of them seem to be born models. But some need just a little encouragement. 
  • Ask children to bring their favorite toys. While not always necessary, sometimes it enriches the scene and makes children looking more natural.
This year after first shooting session one of the parents invited me to her school to make some photos at their place. Apparently she liked the photos. Which is very nice.

6 Mar 2010

Students meet an interesting person

I have been asked by my wife to take a couple of photos at a school she works. There was a meeting organized between a group of students and their parents (about 60 in total) and so-called 'ineteresting person' who were going to tell about last 20 years of democratic changes in Poland.
The basic idea was to take the pictures for a school chronicle (of course) and to create a kind of album for the speaker and hand it over to him as a gift.
First part of an assignment is actually not a big deal - I used to do it many times before.
The photos for an album is a different story. I knew I wouldn't have a chance to take any decent portret photo of the person, neither get any time for one-to-one interaction: his time was very limited, he is in advanced age and it was pretty sure that very soon after the meeting he'll leave. So what I took during the meeting would be the material for an album. That's it.
According to the motto: "Preparation is half of work" I visited the location two hours before the actual event. There would be a small reception before the meeting (with a coffee, cake, etc.) - which was a good news; this creates extra opportunities for interesting photos.
Bad news was the setup of the meeting place:


Crowded audience, a table of the speaker placed in the corner with the speaker back to the window and a lot of glass behind a place where the speaker was going to sit.
Two things came to my mind immediatelly:
- there should be an extra light source out of the camera and not being reflected by the glass wall and put in the front of the speaker,
- there must be a possibility for taking shots from several different angles.
So I've asked the for a possibility of re-arranging the audience sitting places to create some movement opportunities. Then placed and secured an extra light source (SB-600 at the height of about 2 m pointing towards the speaker:


This setup was a good starting point (at least creating enough various possibilities of shooting).
Then the session started. Some interesting (in my opinion) photos have been taken:


One final word about the equipment:
I have used two flashes: one SB-900 attached to the camera (Nikon D-80) and one SB-600 placed on the stand. It gave me enough flexibility. I have learned however that when the audience is really quiet, zooming motor of the SB-900 is making a lot of noise, causing some disctraction. So be careful in the future and consider not using zoom in such situations.

Summary:
- Learned to prepare some "movement space" to be able to shoot from different angles,
- Extra light even from a "typical" angle of 45 degrees can make your photos a way more interesting
- Zoom motor of SB-900 in a quiet room can create a lot of undesired distraction.

Do's:
- Inspect the place in advance, try to adapt it for your needs,
- Talk to the organizers, learn the agenda of the event
- Take different positions during shooting. It enhance the final results and increases chances of a good result

Don's:
- Get surprised by your equipment by discovering a new "feature" during a session