8 Apr 2012

How to choose a new camera body - my approach taken several years ago

I am up to change my primary camera body. What I have chosen and how I'll describe later. But first let me make a short retrospective of my selection process I did 6 years ago, when I decided to take the photography more seriously. Since my decision-taking process worked out quite good, I'd like to share it.

In 2006 I had some (somewhat limited) experience with digital photography. We had the point-and-shot camera from Canon. Good enough to discover the advantages of the digital photography. On the other hand we (my wife and myself) took our 'quality' photos with the analogue SLR from Canon - EOS 300.
The possibilities (and eventually the quality of photos) offered by the SLR camera were much broader comparing to the point-and-shot digital one. On the other hand I was not living under the rock and realized that the time of analogue (film) photography was coming to its end.

So my next camera would be a Digital Single Lens Reflex camera. Then the decision process could start towards a specific model.
The factors that I took into account from the very beginning were:

  • The budget (of course)
  • The flexibility of the set. Six years ago I had no idea how my photography will evolve. So to be on a safe side I decided to look for something universal, yet adaptable to my (likely) changing requirements.
  • The extendibility of the set. When you start you realize after some readings and talks that technique being universally good rather doesn't exist. So you need to have possibilities of extending your basic set with some extra's (like lenses) that would make your gear more powerful over time.
  • The durability of the set (or rather the stability of the hardware ecosystem). When you spend quite some money on the set and decide to have an option of extending it over time you need to consider the camera manufacturers that are established players with the clear focus on their roadmap with respect to the photography.
The above four are quite generic criteria that can be applied to pretty each tangible, extendible system. Those four criteria helped me to make at least a 'short list' of the brands. I came to either Canon or Nikon gear. Remember, we are talking about 2006: Sony was starting with the digital photography, Olympus was not there (as far as I can remember), others didn't seem to have a stable portfolio.
Then reading of multiple pages of specifications started with a lot of tables putting the parameters next to each other, looking for the 'perfect' gear. Guess what? It didn't work  so well. The 'perfect' didn't exist.
If one camera had one important option (say Super option 1), the other one lacked it. For the other option (Super option 2) it was exactly the opposite.
I needed to revise my process and challenge my engineering mind to stop this 'specification madness'.
What has worked for me was the following additional criteria:
  • How does the camera feels? By comparing them one by one in a photo store I was able to decide almost instantly. Nikon was laying in my hands much better than Canon, I felt more comfortable with this gear.
  • How much help can I find about my gear? In 2006 I have discovered a very nice community of photographers called Nikonians. With a lot of information, reviews, comments, and very good sphere. I couldn't find anything similar for Canon users at this time.
Then things started to become easier. The only limitation was the budget. So finally I have chosen to start with Nikon D80 and Nikkor 18-200, 3.5-5.6 VR II lens. And had a lot of pleasure taking some good (and many bad :)) pictures. Later I extended the set with a Speedlight from Nikon (SB-600) and discovered the off-the-camera flash techniques (and the i-TTL system). So SB-900 was to follow (remember the extendibility criteria? Nikon D80 turned to be a perfectly extendible body). Later more lenses came (Tokina 11-16 mm, Nikkor 50 1.4). The journey continued. Six years later I am up to a newer gear, but I never regret my initial choices. 

25 Mar 2012

Fill space with people and a city photo starts to live

This post is a result of my experiments with photographing objects that can typically be found in a city: buildings, squares, tourist attractions, etc. After some initial trials, even if a photo contains the objects I originally wanted to I realized that often something is 'missing'. Let's take a few examples:
I like the above picture because of straight lines, the reflection visible on the right side of the frame. But what is it actually? 2nd try:
Suddenly, the passage starts to live. Now next to the shapes there is a dynamics, and the reflection is even more interesting.
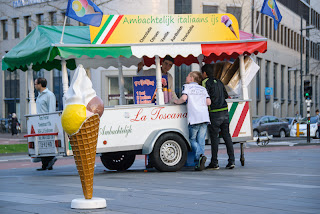
Another example:
An ice cream car. That's it. But wait until the customers come:
Although the two boys and the ice cream man don't fill the frame, they add a lot to the scene. Now the photo starts to live, there is some story ongoing in the frame.
Last example:

This is one of the widely discussed buildings that emerged in Eindhoven city centre several years ago. You can like or dislike it, but  one thing is for sure - it is interesting. The mood of this picture (despite relative warm light) is somewhat cold. Empty space and a big 'egg' raising out of it. The same building with some dynamics around it:

I know that it is subjective, but to me the mood is different now, mainly due to a bicyclist on the first plane.  

So they are people that bring life to the city. Having them on a city photo can change it substantially. Something to remember when taking city shots next time.


15 Mar 2012

It's a pity if someone judges you based on a piece of plastic

This blog should be about photography. Well, what happened to me started with the photography but has ended with a mix of not so positive feelings.
I am going to buy a new lens for my camera. Not so cheap (Nikkor 24-70 f/2.8G ED) so I want to try it out first. There is a company renting the photo equipment nearby my place. They offered (I thought) a good   renting price and the general conditions. After initial e-mail exchange, sending the copies of required documents they announced to me that due to my nationality (!) they need to increase the deposit by 150% (from 400 to 1000 EUR). To be clear: I have presented the personal identity card issued by Dutch government.
I live in The Netherlands since 2001 and it is for the very first time that someone changes the rules because of my nationality. Pity. To make a story complete I have to admit that an employee explained the reasons of such policy to me: basically a big risk of theft and difficulties of undertaking the juristic steps if a thief appears to be non-Dutch citizen. On one side sounds reasonable but on the other it gives a strange feeling. And raises a rhetoric question: would Dutch citizenship made me a more honest person?  Another question is: am I going to play such game? For sure not. Money is not an issue, but there are the principles.

Which brings me to the final issue:
I need to find another company renting the Nikkor lenses because I still want to try it out!

11 Mar 2012

Looking back on own photos - do I improve?

Recently I have scanned through the old photos I have made over past years to sort the tags out a little bit.
Then I came to the idea: if I take the photos belonging to a certain category and put it on a timeline, will I see any trend? Will I see improvement of my photographic skills, for example? Is there anything that I could name as a 'constant element', a style?
So I took the photos tagged as the 'landscape' and taken in years 2007-2012. And it was an interesting excercise. Some observations:

  • Composition of my landscape photos improves over the years. 
  • I need to work on making the landscapes more interesting. I have a tendency to leave too much empty space in the photo, making the picture not as interesting as it could be. How to improve? Studying work of the best in business, scout for the better landscapes is the plan for the coming period.
  • The lighting on most of my pictures is, well, not so good. Here the remedy is simple, I think - get up early, be on a location at the sunrise. Also something easy to try.
To summarize: it is worth repeating this excercise more frequently, it definitely helps. 

26 Feb 2012

Introducing teenagers to the basics of composition and photography

This is about one of the ideas that come to the mind on saturday evening with a glass of wine in hand and a good conversation with your better half.
My wife is involved together with her school in a project called "Lodówka bez tajemnic" which can be translated into "Refrigerator without mysteries". The web page of the project can be found here. It's in Polish, but Google translator can help non-Polish readers quite well.
Anyway, part of the project is to photograph the teenagers participating in the project together with a refrigerator. When we started talking about the idea pretty soon we agreed that it would be good to let children make the photos by themselves with some introduction and guidance.  The idea was born.
But then the realization. We thought a workshop-like approach could work. The time was limited (2.5-3 hours), and we wanted to achieve some educational effect, next to the photos. And (some extra requirements from my wife) it would be great if a references could be made to the Dutch culture and art.
Having the limitations in mind I decided to divide the time into four blocks:
  1. Theoretical introduction to composition in photography,
  2. Discussion on how to create a composition with students and the refrigerator,
  3. Shooting session of the chosen composition (where each student had a chance to take the photos and experiment with the composition)
  4. Critique and selection of the best photos.
As one can see there is nothing about technicalities, like depth of field, shutter speed, ISO, "just" composition. Of course since composition is a huge topic, I limited it to the very basics: rule of thirds, leading lines, filling the frame, using patterns, using the frames. For rule of thirds I have built some context by showing the examples of the golden division in the architecture, astronomy and biology (remembering about the educational aspect of the workshop). Each rule I have illustrated with my own pictures. Purposedly I didn't choose to show too many bad examples (actually limited to 1 or 2 only).
Then I took some time to show how Rembrandt applied the composition rules on his two paintings: "The night watch" and "The Anatomy Lesson of Dr. Nicolaes Tulp". At last I have shown some pictures of Henri Cartier-Bresson.
Second part went surprisingly fast. Children decided quickly on three setups to test. Preparing a setup required some coaching. I was keeping to attend the students to watch the scene through the camera to see the limitations of the frame with respect to a naked eye. For some of them it was real discovery, by the way. Another aspect was to remind them to try different scenery, looking at the scene from the different angle, try totaly different setup.
We could do this since the fridge we use was just mobile fridge with a lot of fruits inside.
Then the shooting. They started by shooting in the standing position. After my suggestion to get lower, stand up on a chair they started to discover new possibilities.

The critique sesssion was something I was a little bit afraid of. The teenagers have a quite sensitive ego. On the other hand some of their photos deserved some critique and improvements. As a first precaution I have put all photos all together to make them a little bit anonymous. And made an agreement with the students that if we critique we do it constructively by indicating what could be improved having composition rules in mind.
And I must say, the session went surprisingly well. They listened to each other, took suggestions with attention and admitted possible improvements in their photos.

What did they learn? I think the rule of thirds and leading lines was the most easy to grasp and visible on the photos. Filling the frame and using the frames was a little bit faded. They practically didn't experiment with patterns. But it is understandable seeing the limited time.

Was it all with all successful? Well, I got some signs it was. I was running out of time and actually extended my time limit by 30 minutes - such a beginner's mistake. But some children called their parents asking them to pick them up later because they wanted to stay until the workshop is finished. According to the school staff it doesn't happen often.

Finally, some traditional "dos and dons"

Dos:
  • Ensure the professional teacher is with you in the location all the time. Teaching is a serious issue and in case something goes wrong you have to use help of the professional. In most countries it is also required by law that there is a qualified personnel in a classroom all the time. So don't forget that. 
  • Dare to ask the teachers about your performance afterwards. They are professionals and their feedback on how well (or how bad) you were as a  "teacher"  is invaluable
  • Have initial setup to be photographed in mind. At least you know what might work best in advance. And you have limited amount of time so you need to steer the session every now and then.
  • Limit the group. I have worked with 7-8 children and I think it was an upper limit I would say.
  • Prepare a number of cameras. I had 1 DSLR and 3 compact cameras. So half of the group was shooting all the time while other half was posing. So everyone was busy.

Dons:
  • Leave children doing nothing for a longer period of time. Initially I didn't pay enough attention to this aspect and suddenly a kind of chaotic atmosphere started to emerge. Thanks to the supervising teacher the situation got back quickly under control.

17 Feb 2012

Small tip for working with sharpening in Lightroom 3

Sharpening tool in Lightroom Develop mode is a sophisticated and powerful one. Sometimes however it is difficult to judge what the effects of the sliders would be. By using sharpening sliders while having Alt key (Option on Mac) pressed Lightroom will display a Black and White view showing the effect of the slider. Let me show an example:
The photo above is applied a Masking with quite big value (77). But what it means for the processing exactly? Well, when you press the Alt key and move the slider, the image turns into black and white, showing the mask. Black areas are the areas unaffected by the sharpening tool, while white shows the areas where the sharpening is applied:


Moving the slider to the left (decreasing the masking) adds the sharpening to more more elements of the image:

You can use Alt key with all sharpening sliders (Amount, Radius and Detail). To me using it with the Amount slider seems to be quite useful. Look at the detailed view with a specified amount of sharpening:
The same fragment with Alt pressed:
Using the black and white view instead of colour helps to reveal the details of the texture better and apply the right amount of sharpening.
I hope someone will find it useful.

11 Feb 2012

Shooting a multi-portrait session in tethered mode - the impressions

Today I was shooting another multi-portrait session of several dozens of children (from age 0.6 to 6-7).
The setup I used was quite similar to the one I used earlier and described here. For today's session I decided to introduce a new element: a laptop connected to the camera, so I was able shoot in so-called tethered mode.
This way of shooting is adviced by a lot recognized studio photographers. Obviously it gives one clear advantage, one can judge the quality of a picture taken much better than on camera LCD. But I found out that there more advantages. More on that later, now some technical stuff.

Iteration one:
Tethered mode in Lightroom is not supported for Nikon D80. So in the first approach I have installed an "intermediate" application called Camera Control from DYIPhotoBits. It's free and it recognizes my Nikon D80, so the rest was easy: I configured the destination directory of Camera Control as a directory to be monitored by Ligthroom (In Lightroom choose File->Auto Import->Auto Import Settings... and then File->Enable Auto Import to start monitoring).
Then connect the camera via USB to the laptop (don't forget to set the USB port in your camera to the PTP mode). From now on, whenever a picture is taken, it gets saved by Camera Control, recognized by Lightroom and imported to the Lightroom catalog. There is one drawback of this approach: the latency time between shooting and getting a picture in Lightroom. So it was working, but is was not smooth (in my case it took 10-11 seconds from the shot to the file available in Lightroom for preview. Go to iteration 2


Iteration two:
The Camera Control Pro from Nikon is the application that was tested as second. For Nikon 80 version 2.0 didn't work, so after installation the immediate update to 2.8 was required. Luckily the trial version works for 30 days, so I could use it for the session. The application performance was a way better comparing to the solution from iteration one (the time from shutter release to having image available on the laptop was 2-3 sec). So this was chosen as a solution for the session

Advantages of tethered mode
Indeed, looking at a photo on a 15'' screen enables much better quality control than LCD. But there is more, much more. It gives you a possibility to interact nicely with the customer (in this case parents of the photographed children). And that is win-win situation: in my case parents could easily pick up the photos they liked, I could listen to their comments and learn what they actually like. Plus, I was able to take notes about extra wishes (like required number of prints) just in place.

Learnings and practical tips:

  1. Tethered mode is a way to go for studio sessions. I am fully convinced.
  2. Remember to secure the USB cable, especially in presence of small children. They really don't care about your stuff. So I fastened 30-40 cm of the cable to the floor with gaffer tape, so the chance of suddenly pulling it from the laptop (or dropping the laptop on the groud) by accidental stumble was minimized
  3. I was using 5m long USB cable which was enough and gave enough flexibility.